Table of Contents
Overview
This resource is in five parts
- Resource 1: Learn how to operate a servo.
- Resource 2: Use a servo to make a rudimentary bush fire risk indicator controlled by buttons on the Kookaberry
- Resource 3: Use a temperature sensor to change the risk level.
- Resource 4: Learn how to debug a programme in real time
- Resource 5: Build and programme an indicator using the new Australian Fire Danger Rating System (AFDRS) which only came into use on 1st September 2022. This includes 3D printing files for building the indicator and needle and a pdf of the indicator face image.
The resources can be used to enhance the understanding of learning outcomes associated with Climate Change Units and Lesson Plans.
The Kookaberry microcontroller STEM platform programmed using the KookaBlockly visual programming editor will be used in this project
The various iterations of code for these resources, together with a pdf of the resources can be downloaded from within the Firerisk zip file in the sidebar to the right.
Age
This plan is targeted at students in years 5&6 (Stage 3) but can be introduced in Stage 3 and as a bridging course between visual and text-based programming languages in Stage 4. This is because KookaBlockly allows students to see the text-based python code behind the blocks.
Context
Bush fires are a feature of life in Australia. Signs indicating the severity of risk are everywhere alongside country roads. Check out this post from the About Regional website.
The risk of a bushfire depends on a number of variables – the main ones being temperature, humidity and wind speed. In Resource 3 we will only be demonstrating temperature.
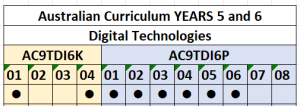
Learning Outcomes & Curriculum Map
- How extreme weather events can affect the Earth’s surface. [Bush fires and warning signs] AC9TDI6P01
- Learn about digital systems [Integration of peripherals with the Kookaberry] AC9TDI6K01
- Write and edit a programme in a visual programming language [KookaBlockly] AC9TDI6P05 AC9TDI6P02
- Learn about, use and control different output devices [Servo and temperature sensor] AC9TDI6K01
- Learn how to trouble shoot through trial and error whilst programming in real time [Vary sleep times]
- Learn how to use branching statements (if/do) in programs [If button pressed or temperature reached] AC9TDI6P05
- Learn how to position and write text on a screen [Position and format text on Kookaberry’s screen] AC9TDI6P03
- Learn how to input and change user data in a programme [Pin numbers and text position] AC9TDI6K04 AC9TDI6P04
- Evaluate designed solution within context [see if you can design a better indicator] AC9TDI6P06
- Save and rename files across multiple locations [Add a .kby suffix]
- Learn how to debug a visual language editor in real time [Resource 4]
Prior Knowledge
Before commencing this set of resources, teachers and students should be familiar with the following concepts and technology fundamentals.
- Copying, moving, and pasting files
- Digital Systems: Introduction to digital systems
- Using the Kookaberry: Getting started with the Kookaberry
- Using KookaBlockly: KookaBlockly
Project resources
Kookaberry & USB lead
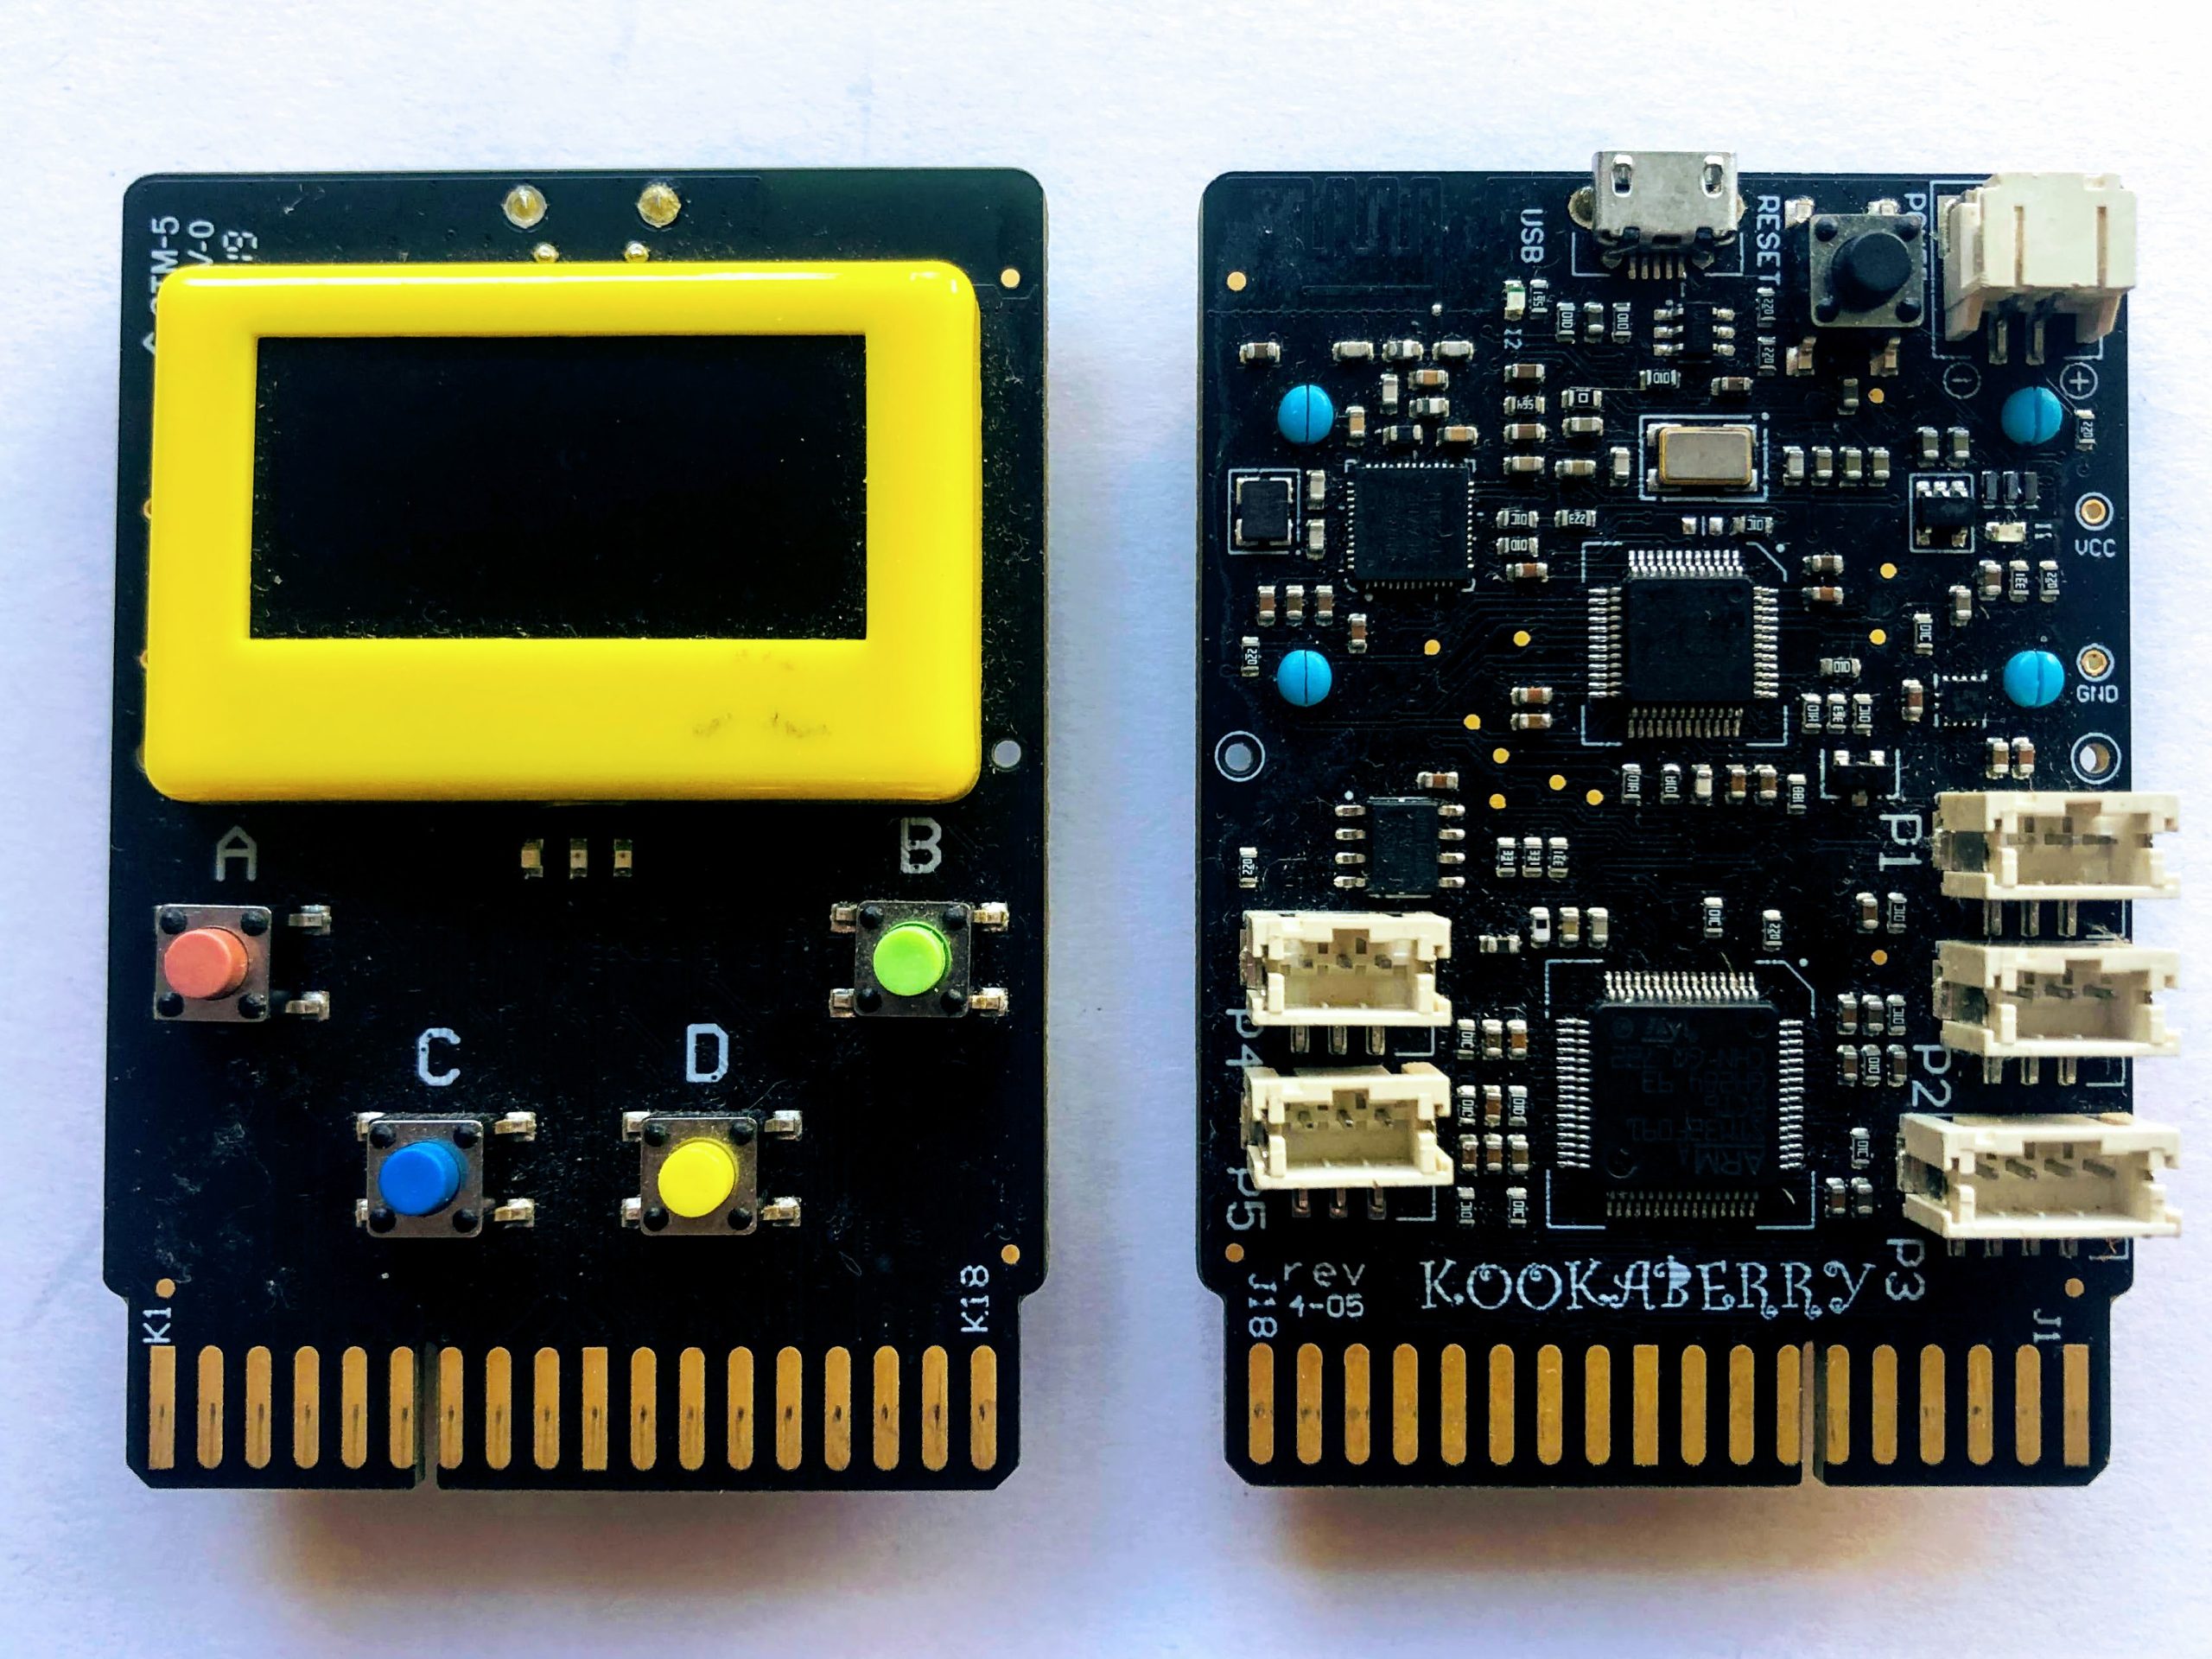
![]()
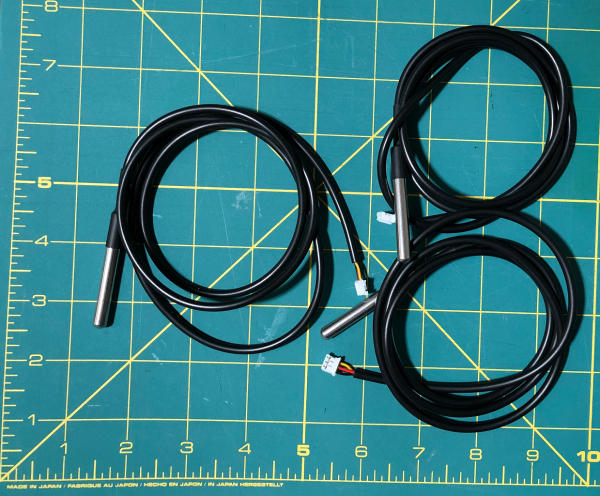
Micro Servo and DS18B20 thermometer

Resource 1: Operating a servo (very simple)
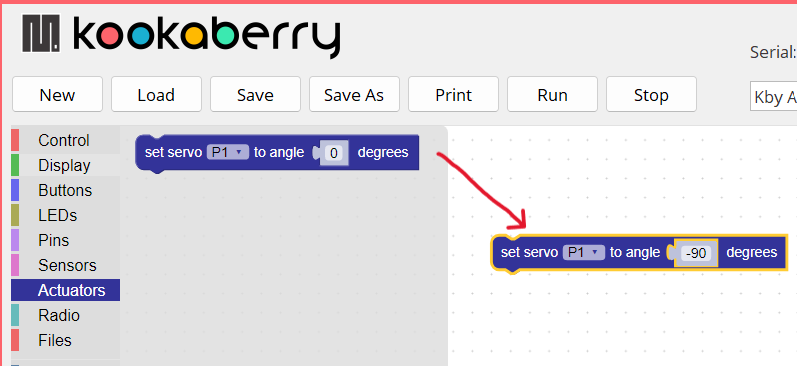
Connect a Kookaberry to a PC or Mac, and plug the servo into socket P1 on a Kookaberry. Add one of the plastic arms to the servo. Open KookaBlockly and create the programme shown below to rotate the servo. Drag the block from the Actuators menu, type an angle into the servo block, and then run the programme. It’s that simple!
Resource 2: Manual bush fire risk indicator
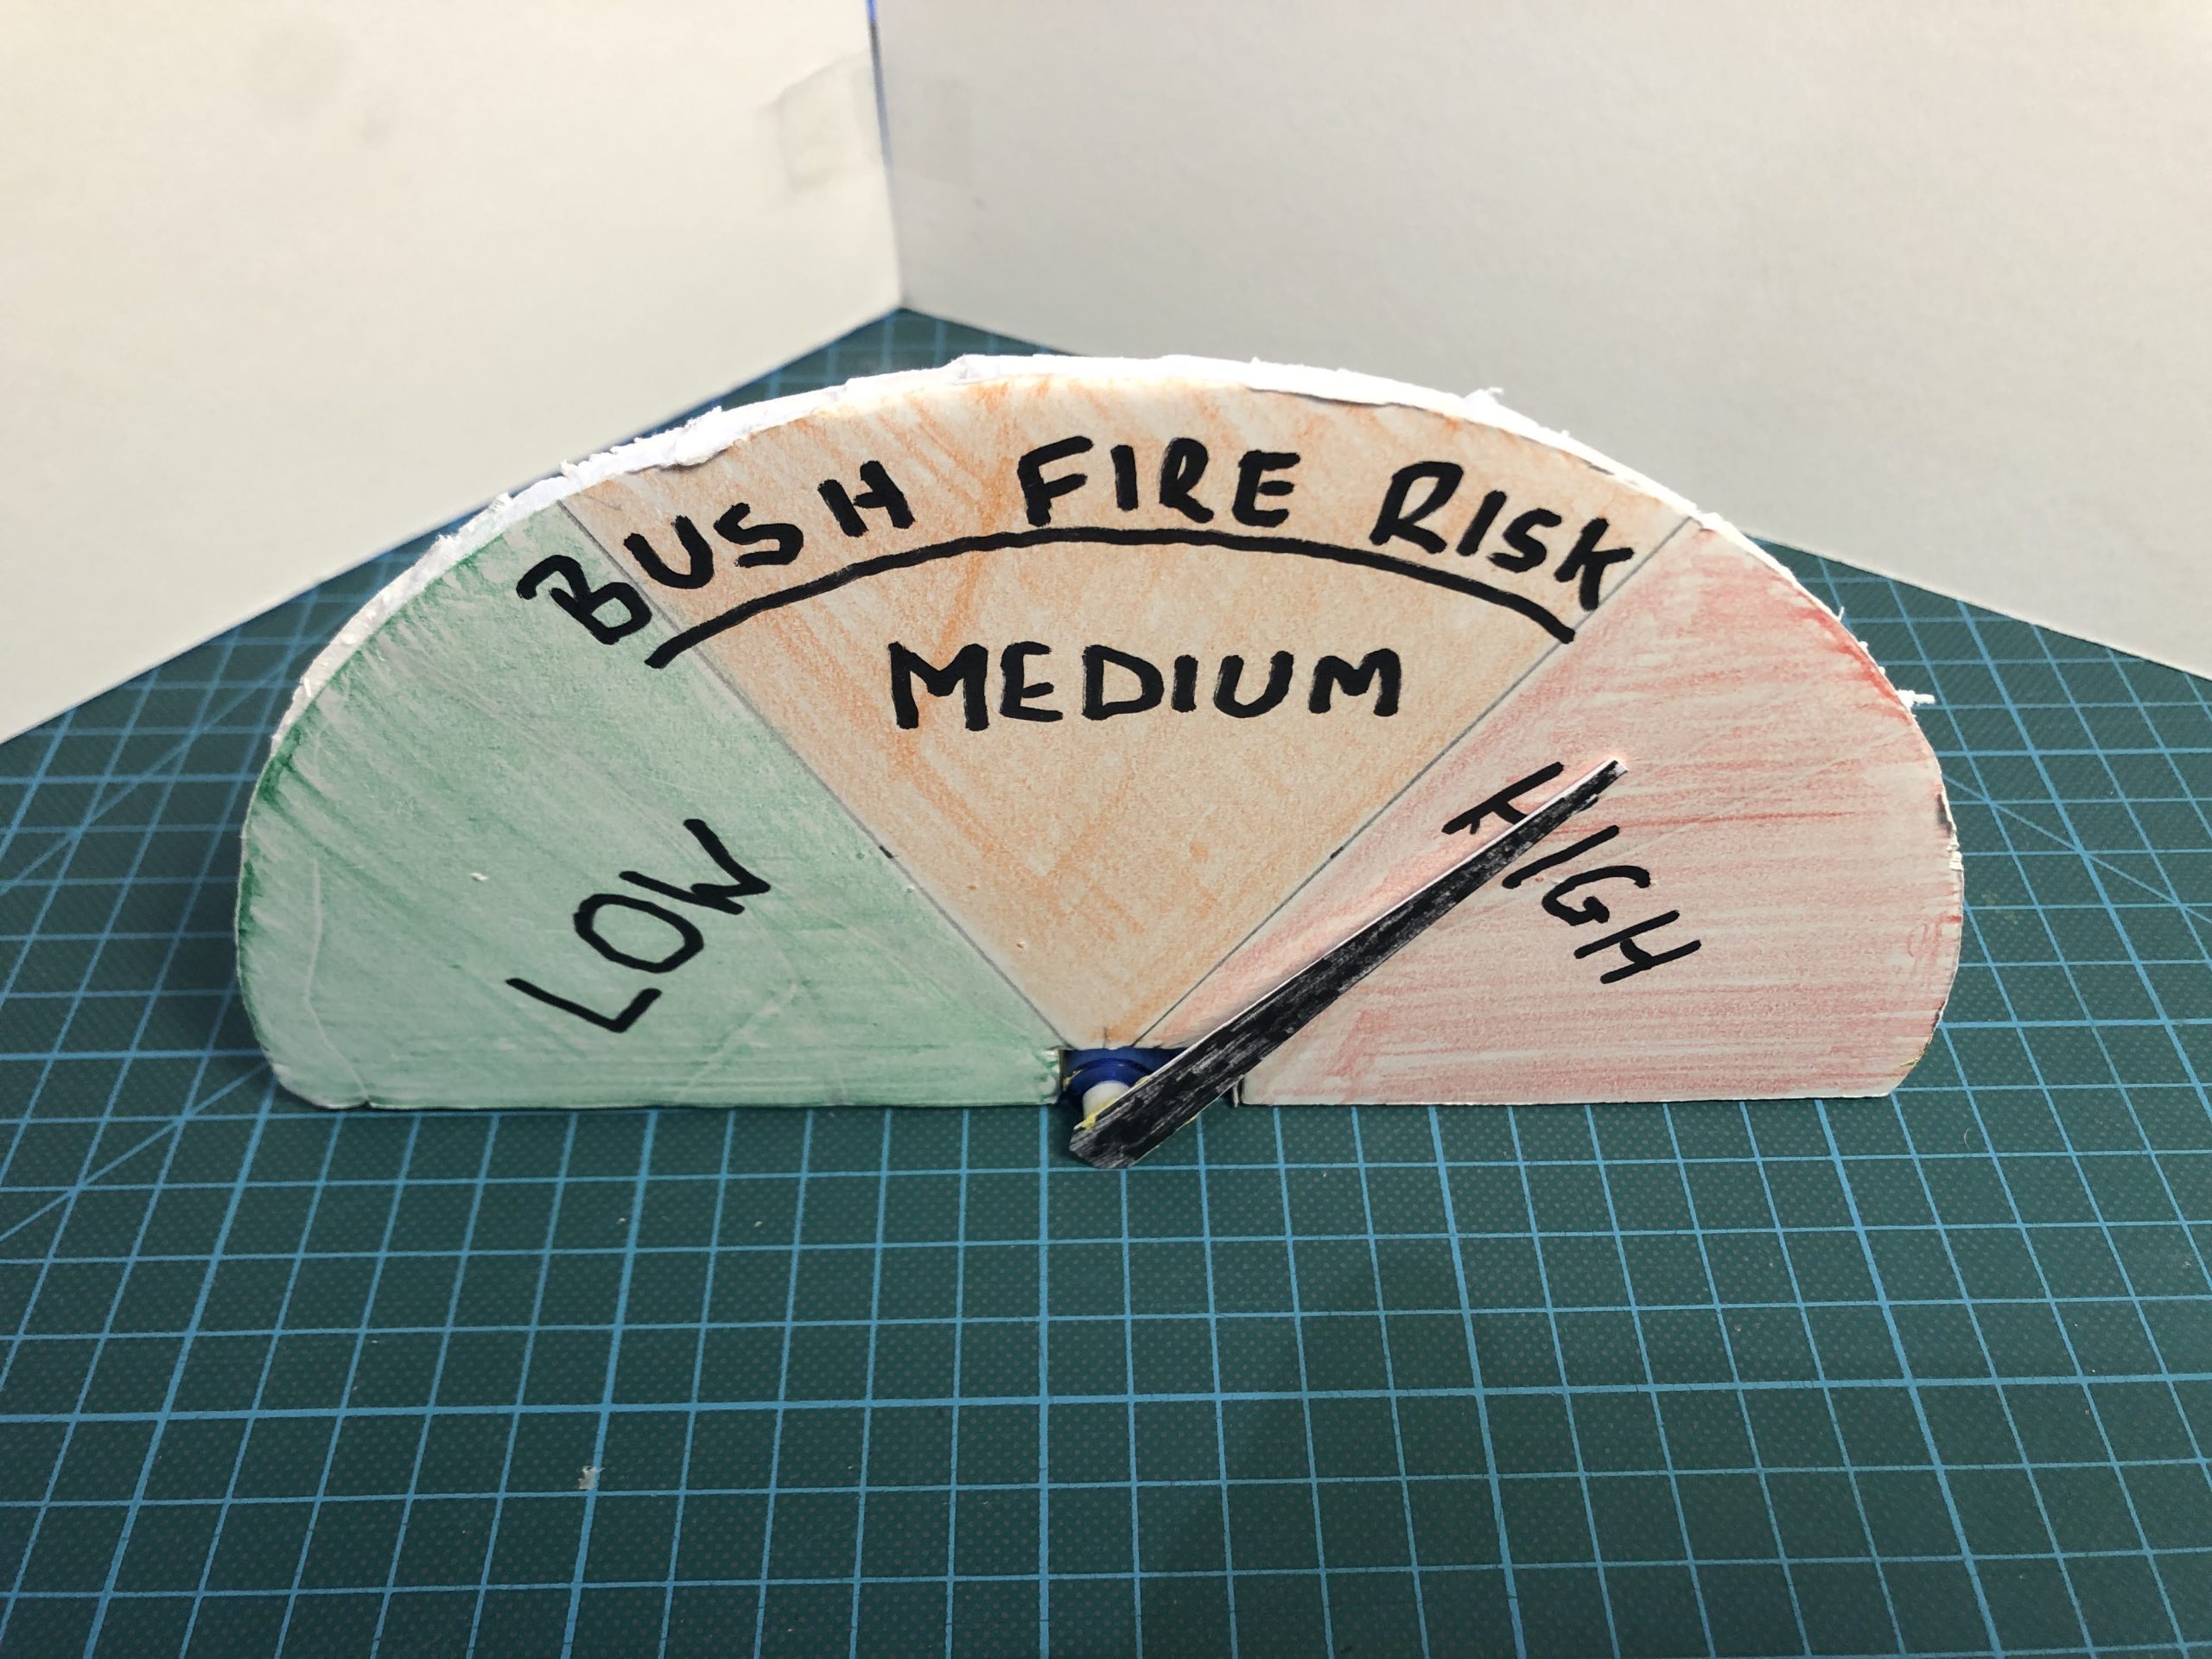
In this resource you will be creating a KookaBlockly programme which will move the indicator pointer between the three segments when a button on the front of the Kookaberry is pressed. The warning will appear in text on the screen and the LED’s will light as well.
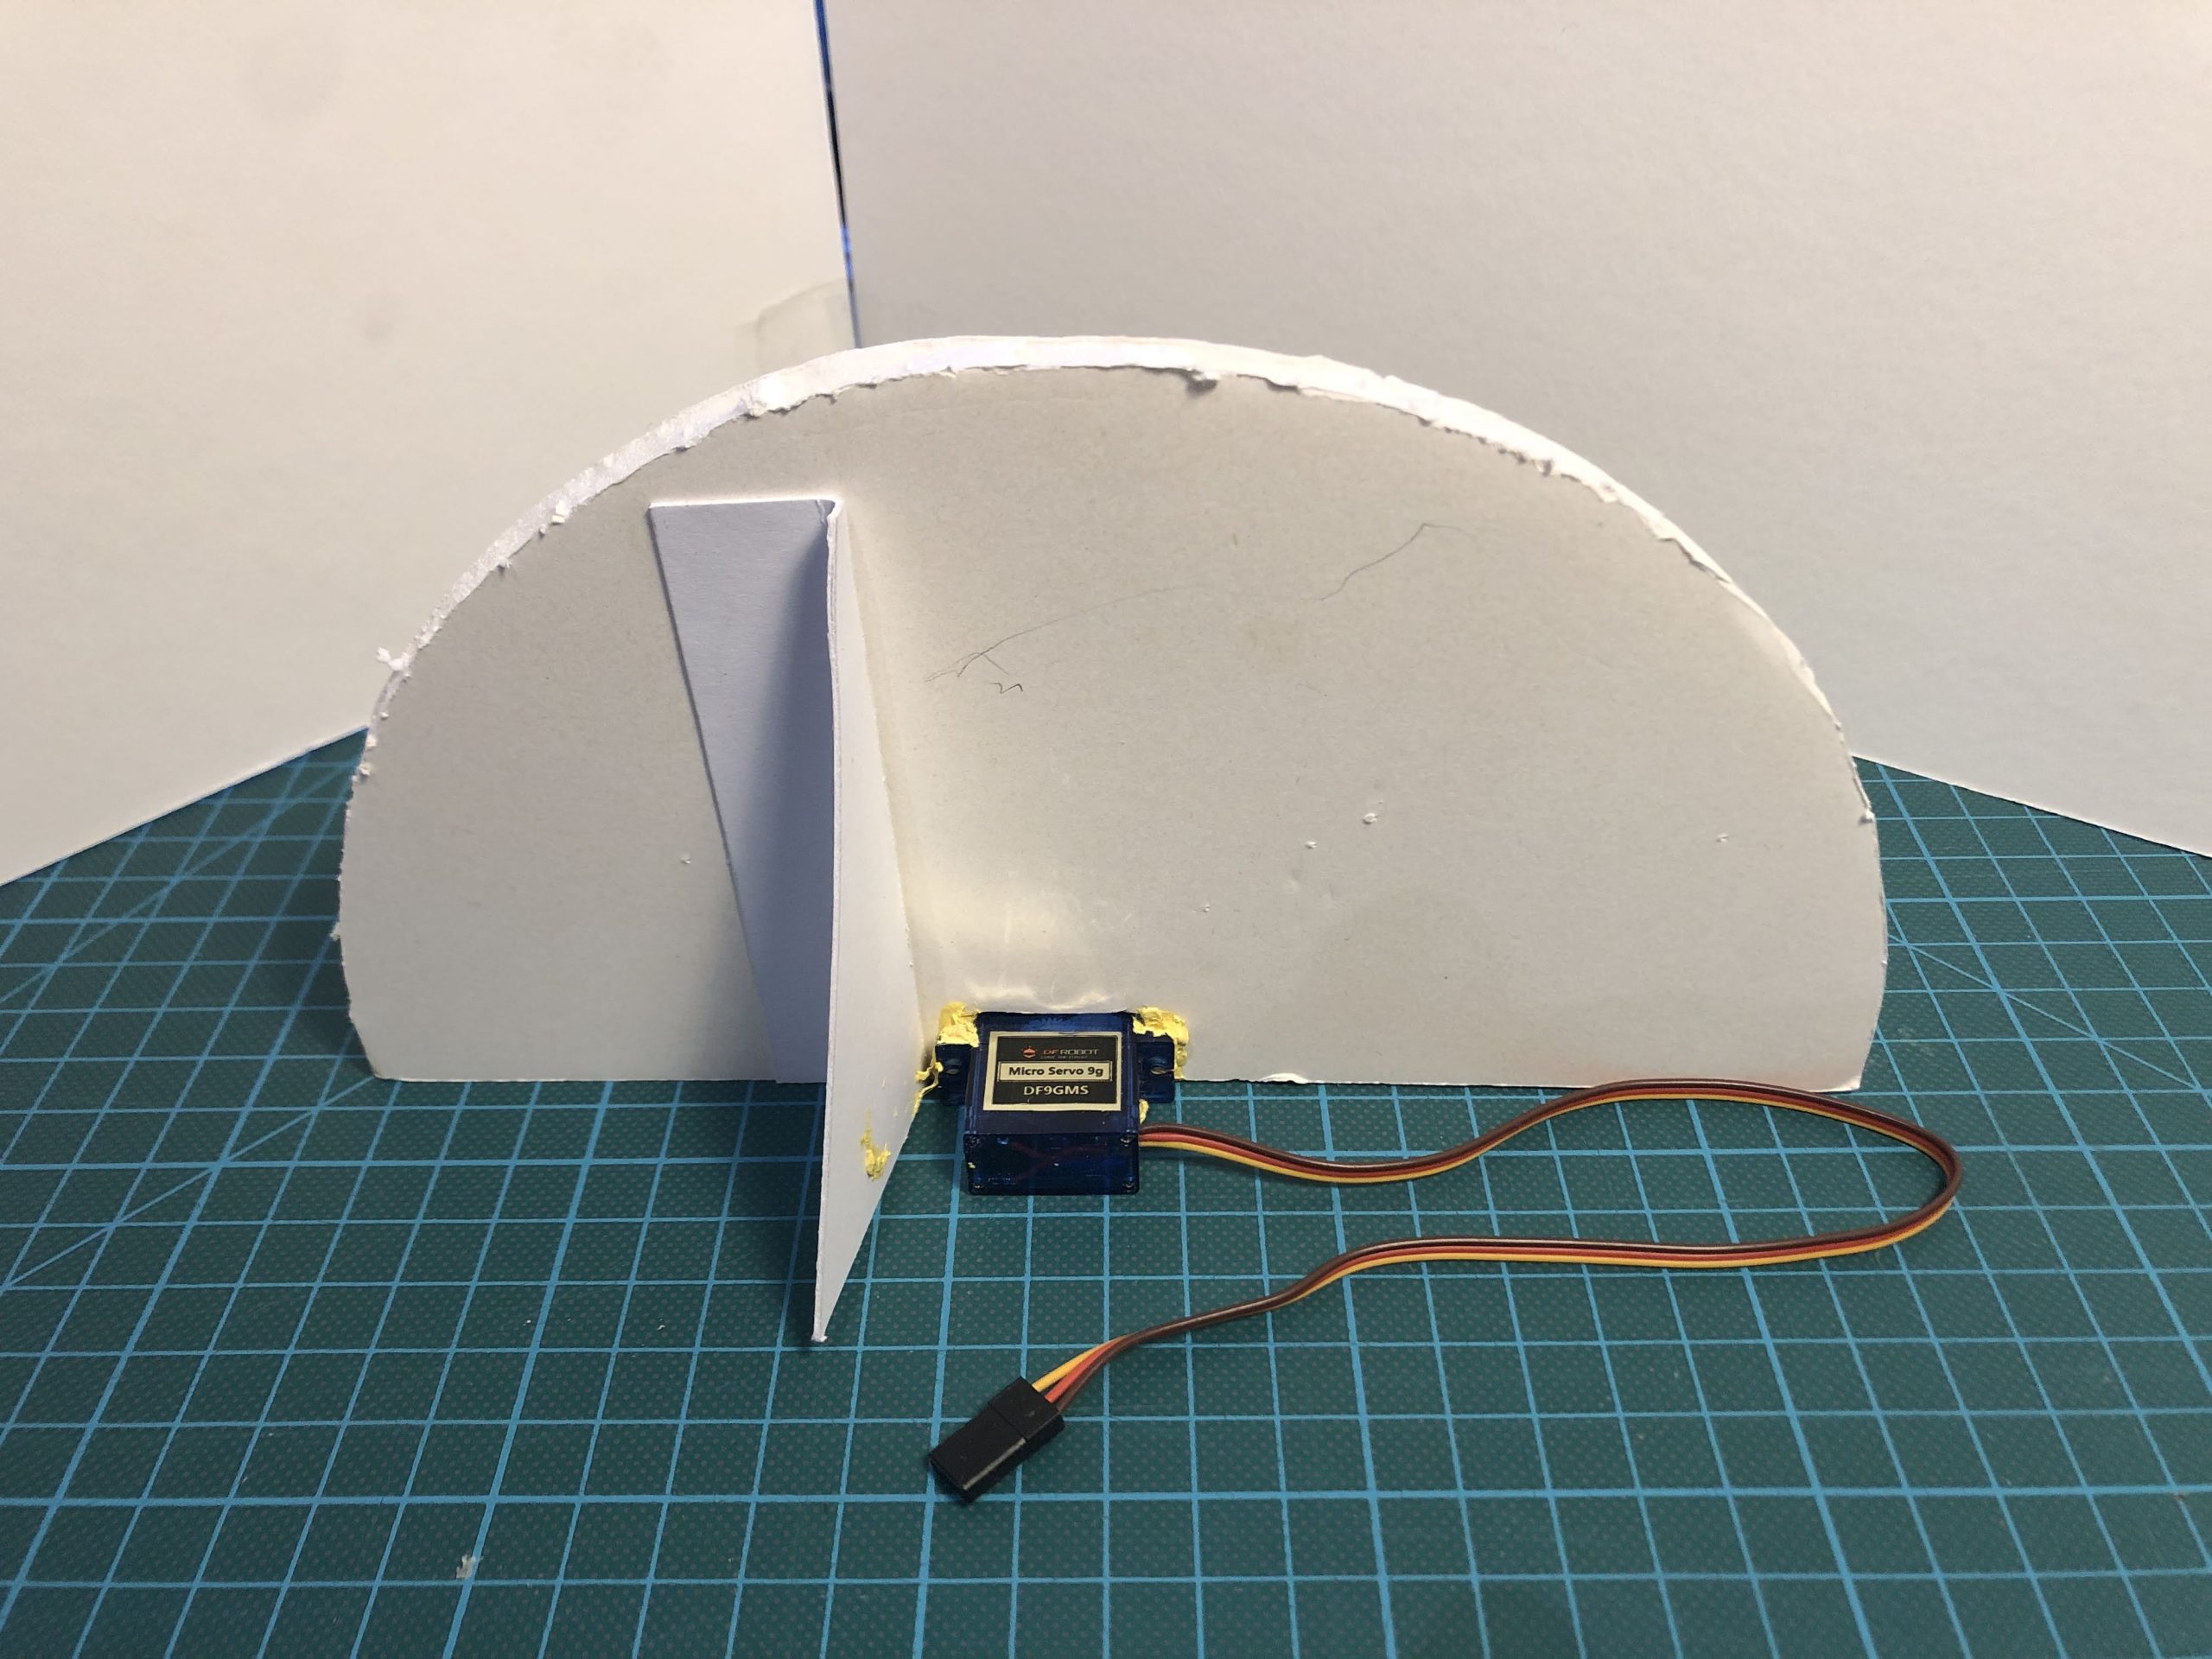
Making the risk indicator
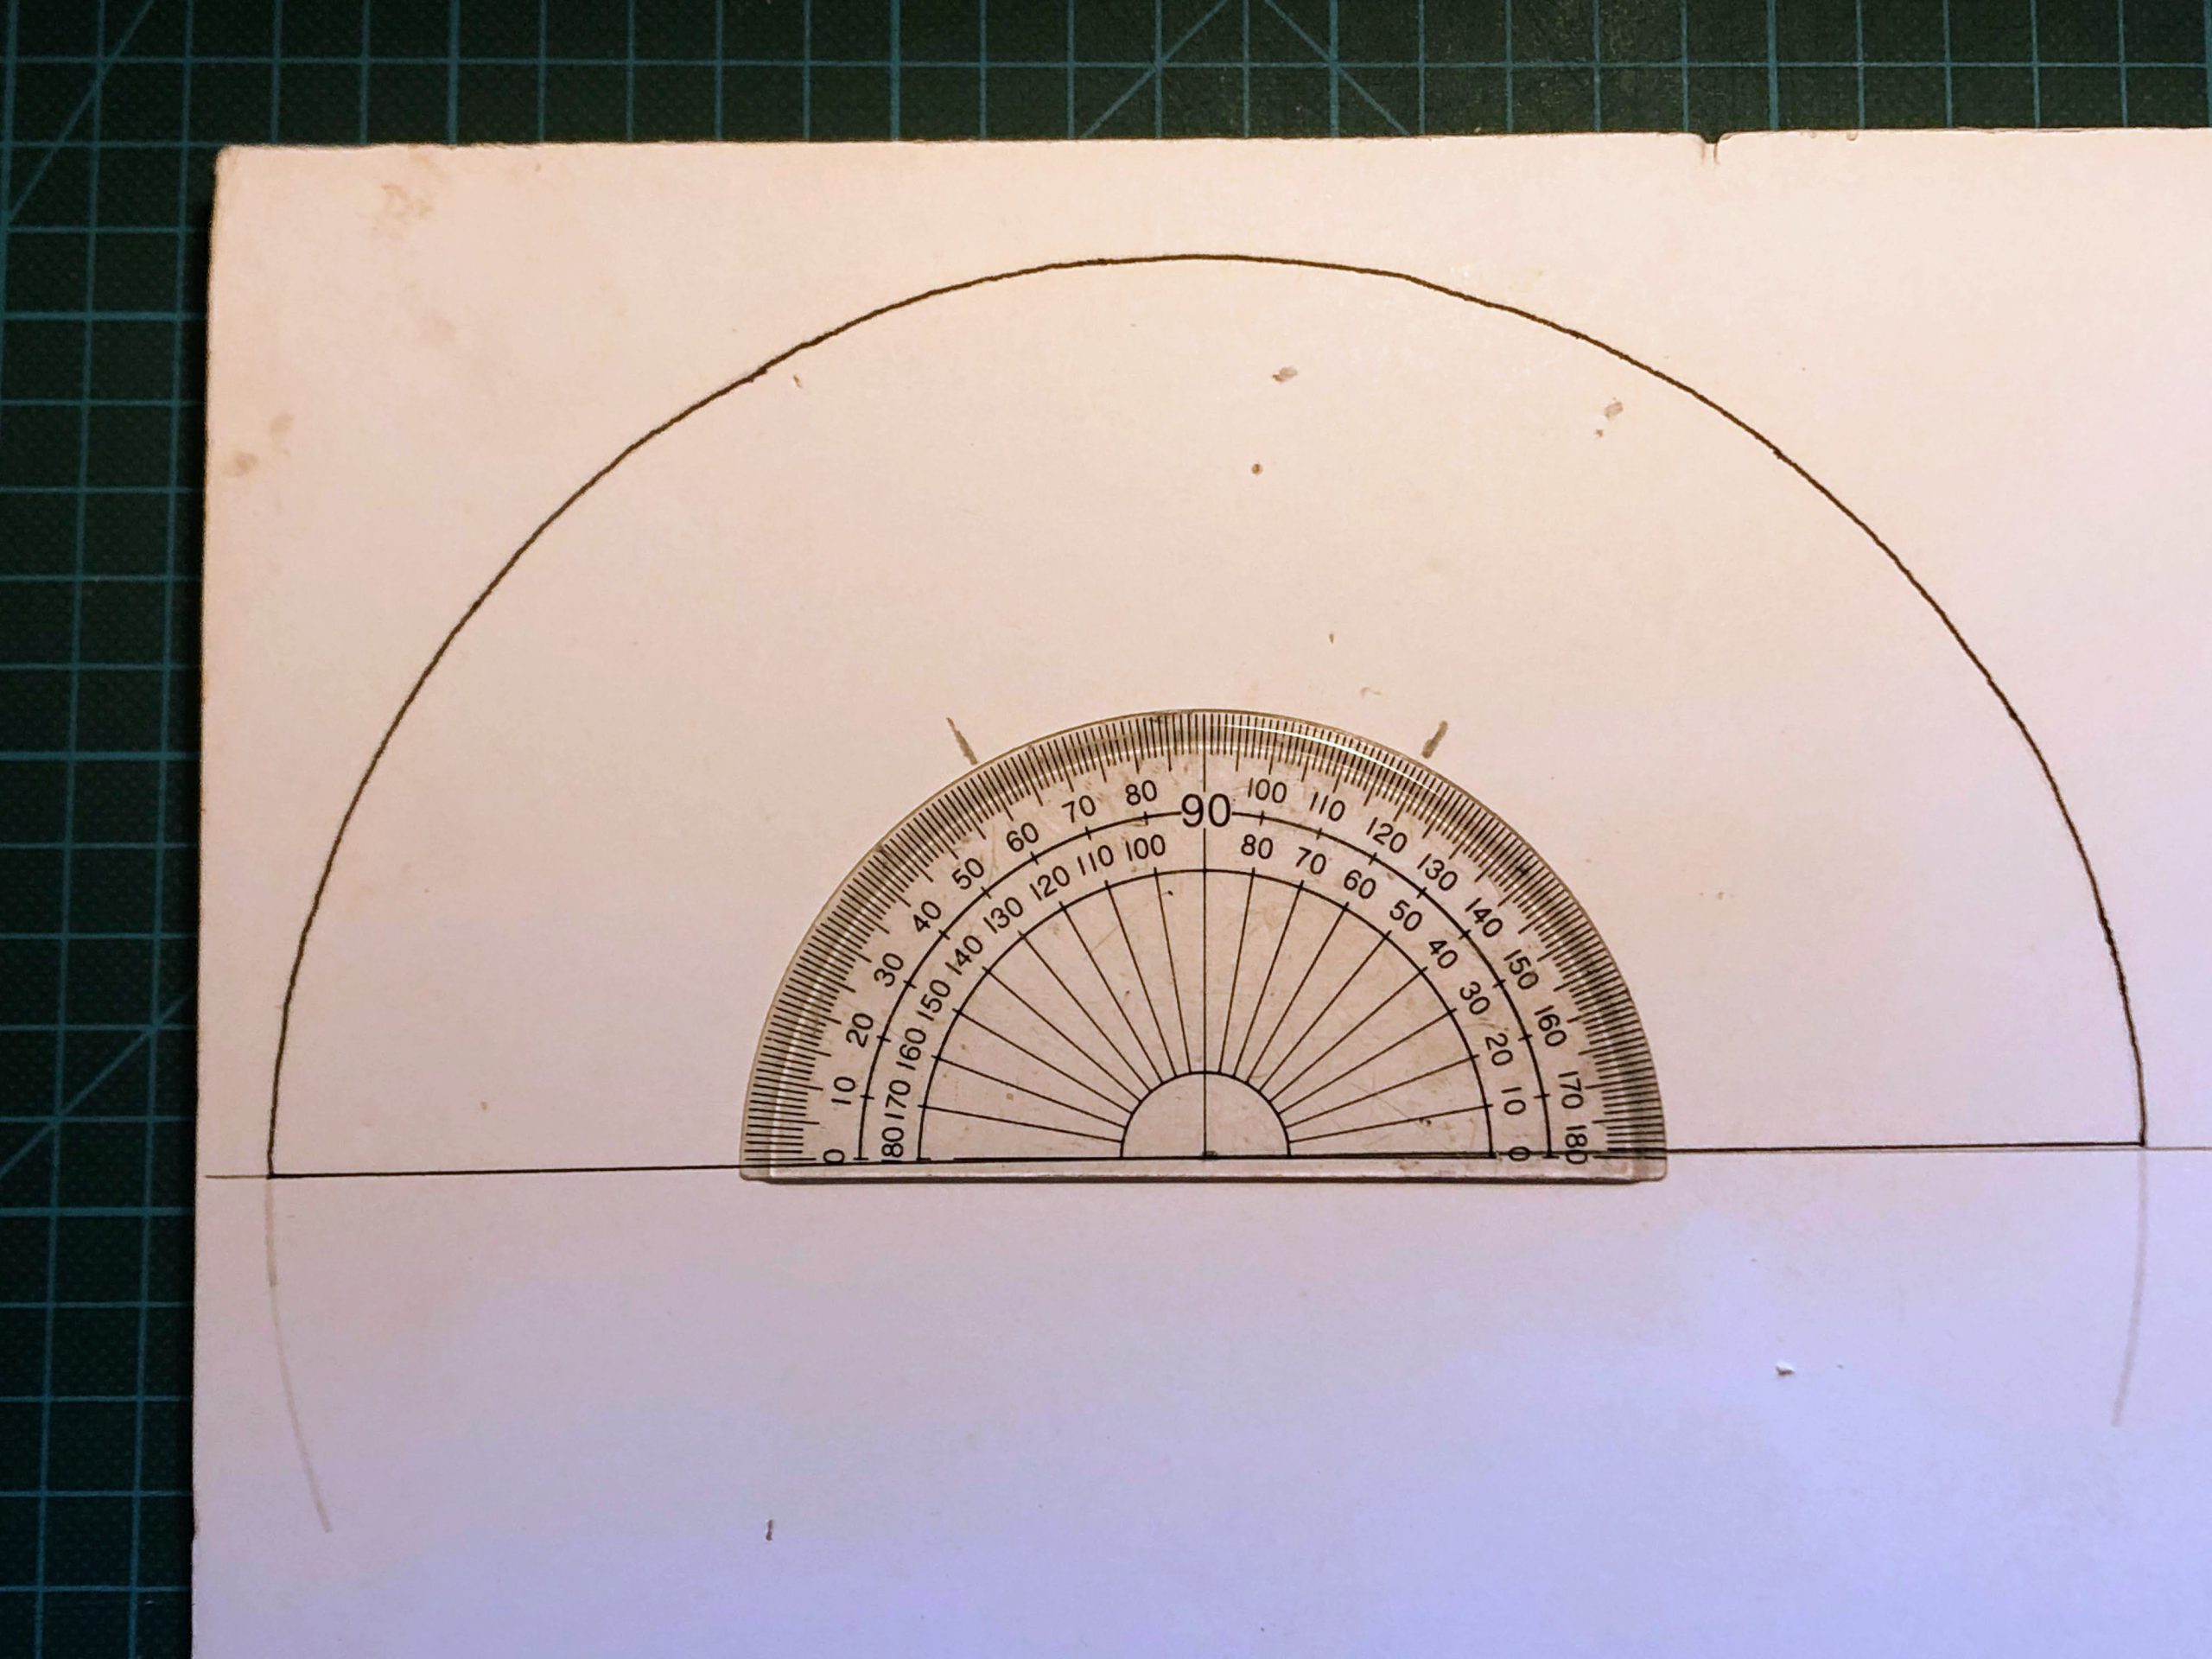
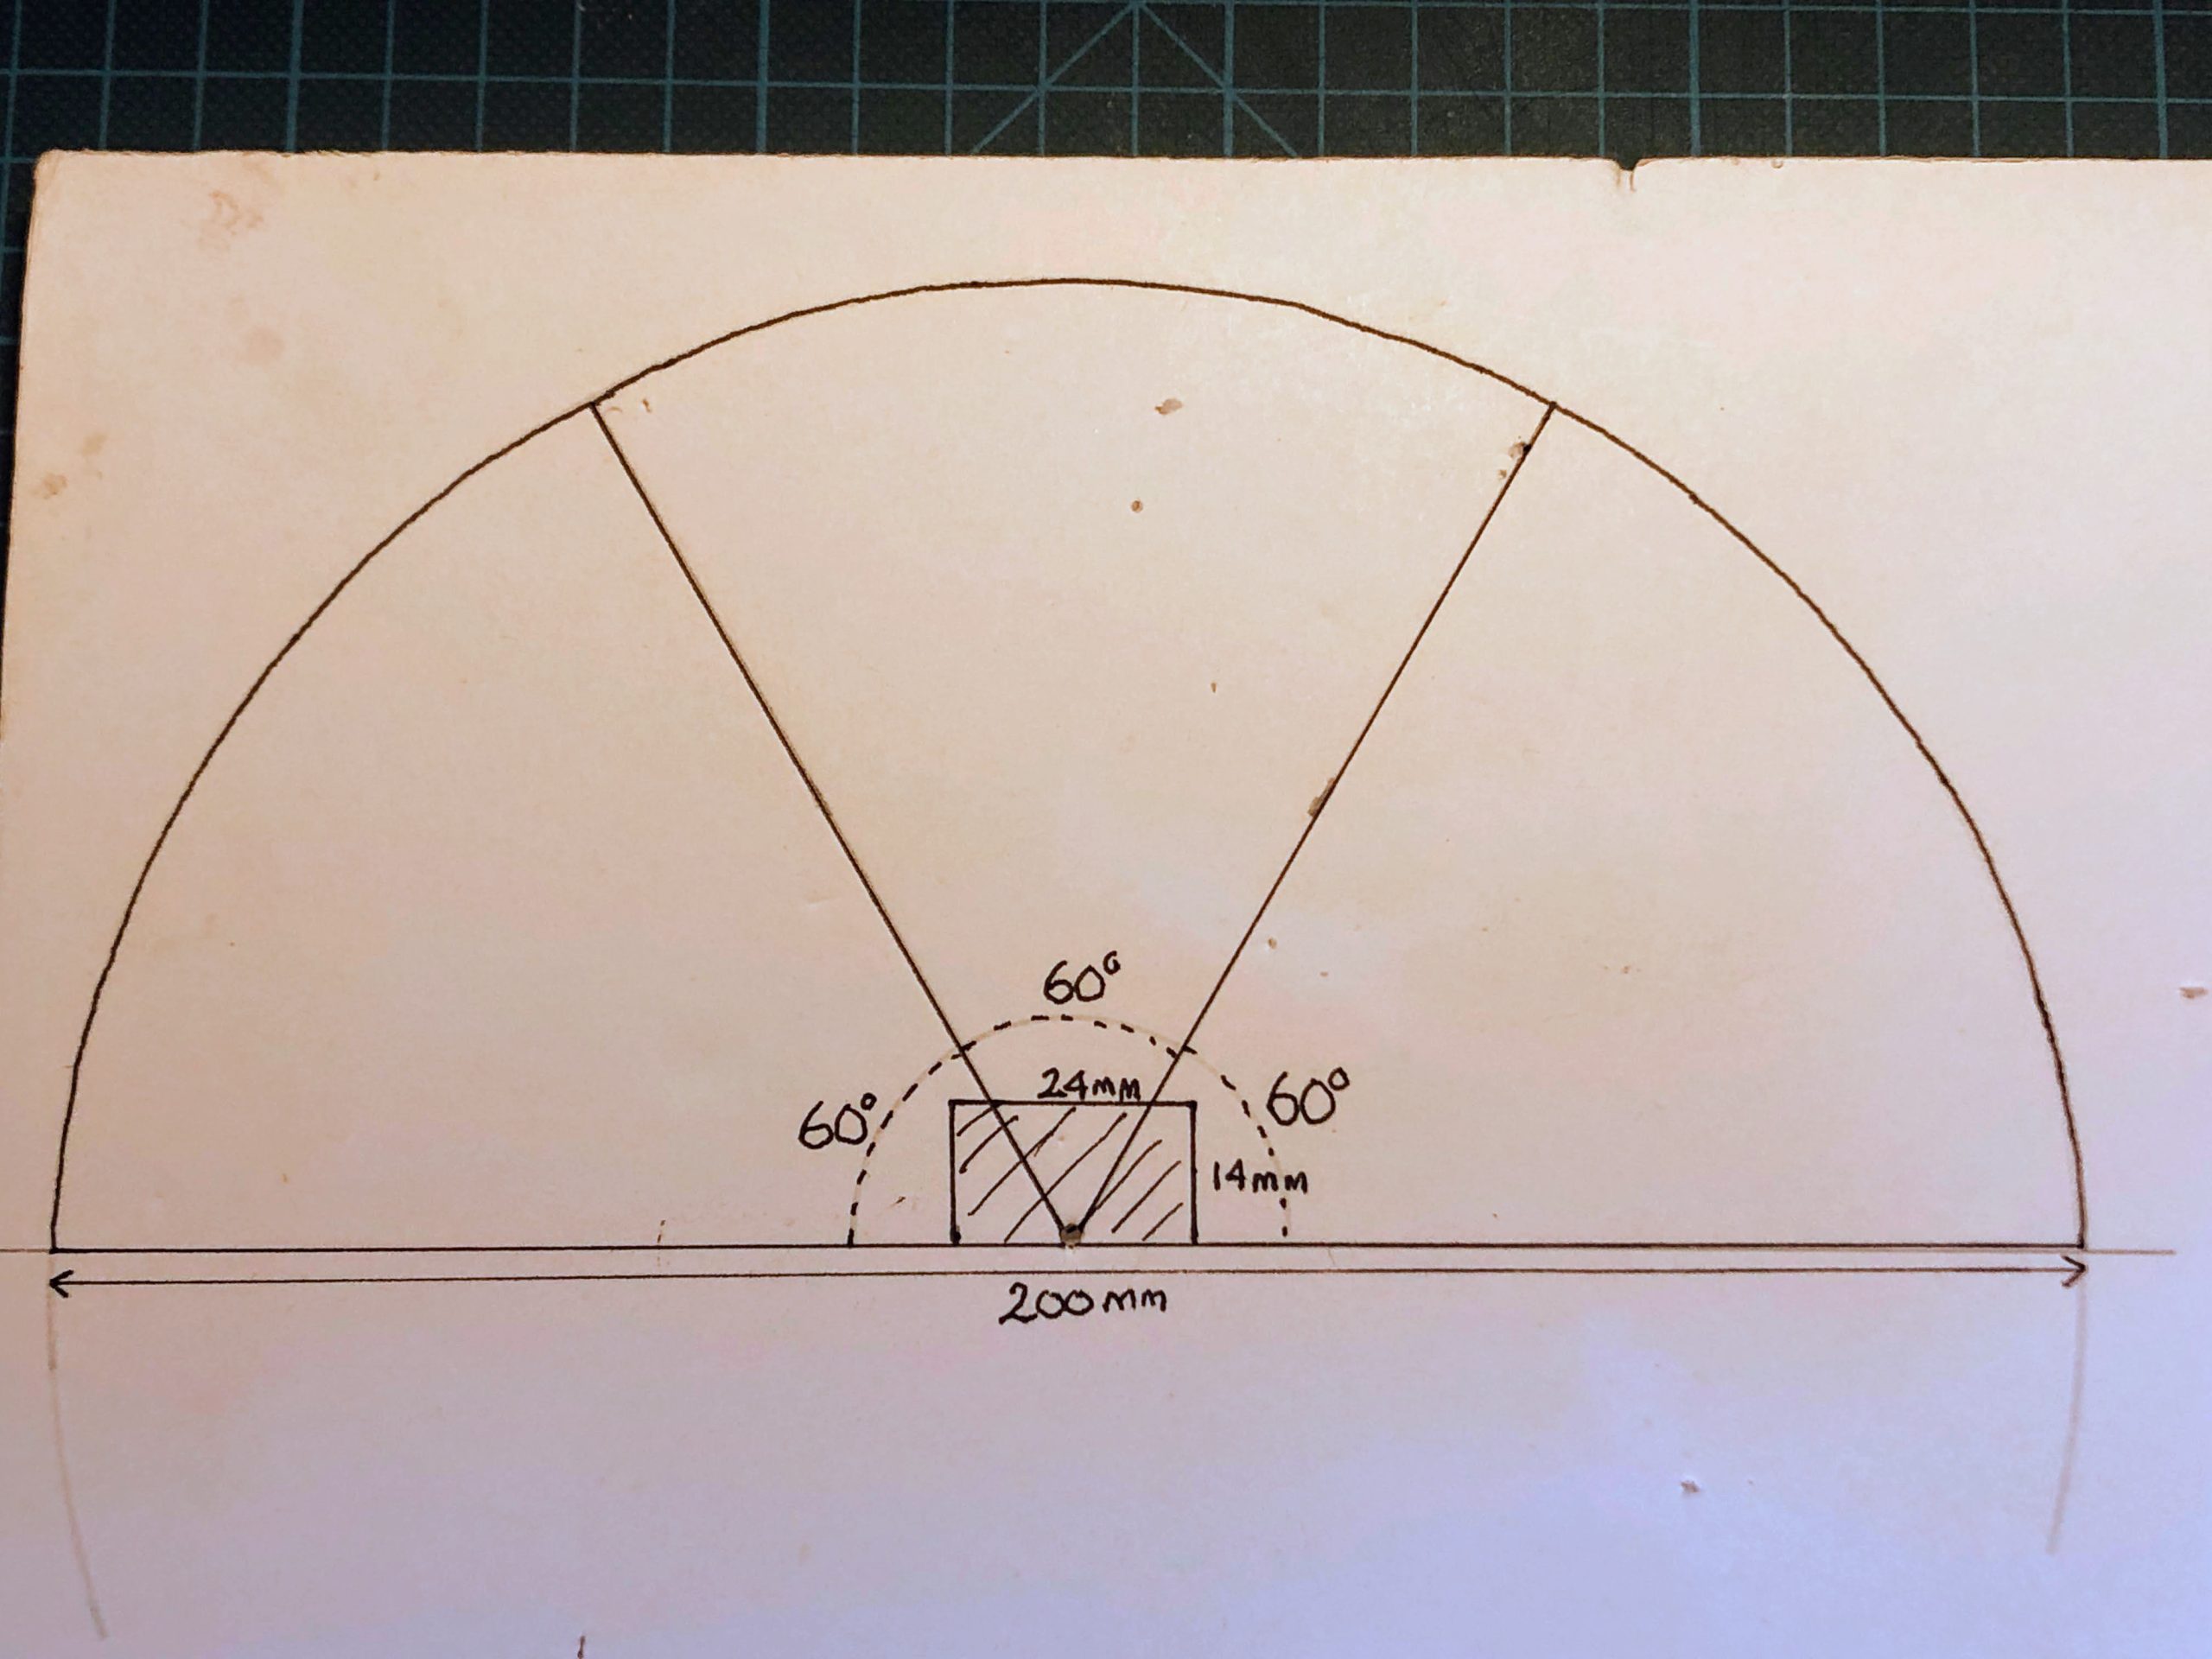
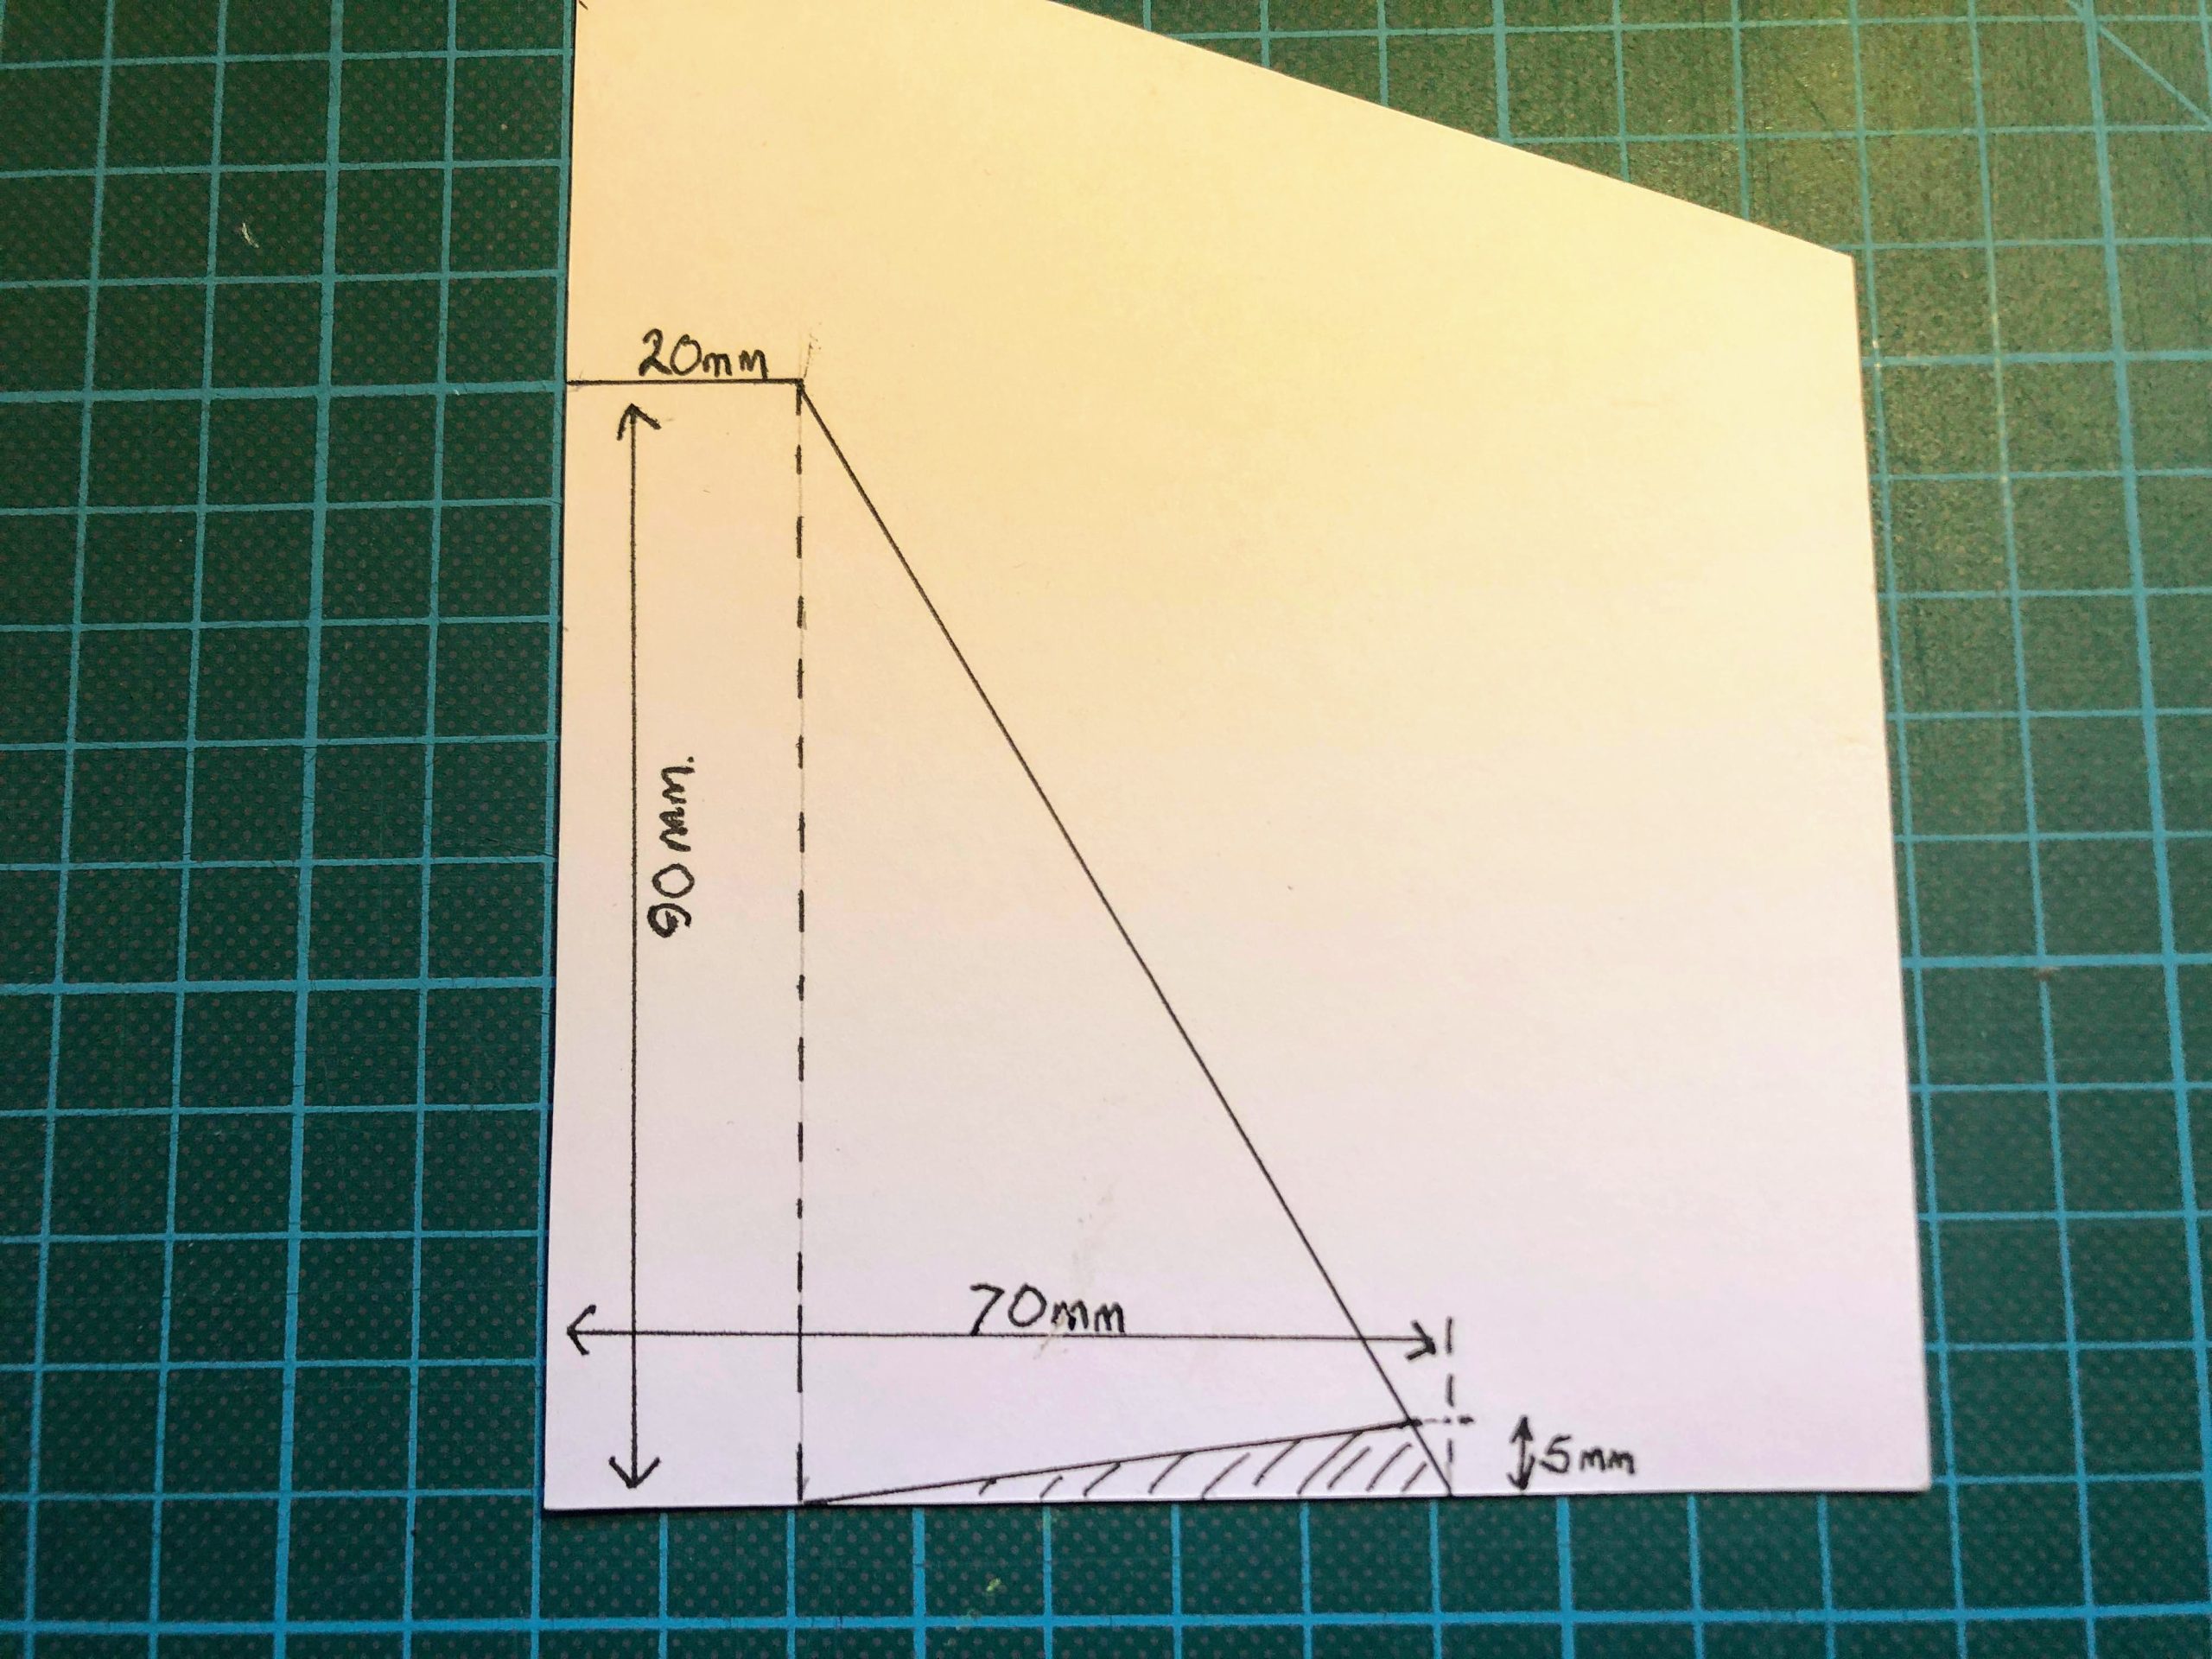
Take an A4 sheet of 5mm Foam Board (available at Officeworks) and cut out a semicircle 200mm in diameter. This will become the the fire risk indicator. Cut a rectangular slot ( 24x14mm) exactly in the middle at the bottom of the semicircle (this is where the micro server will sit). Now cut out a triangular piece of stiff (600 gsm) card to glue onto the back. Cut a small angle out of the bottom of the card to allow the indicator to lean back when placed on a flat surface.
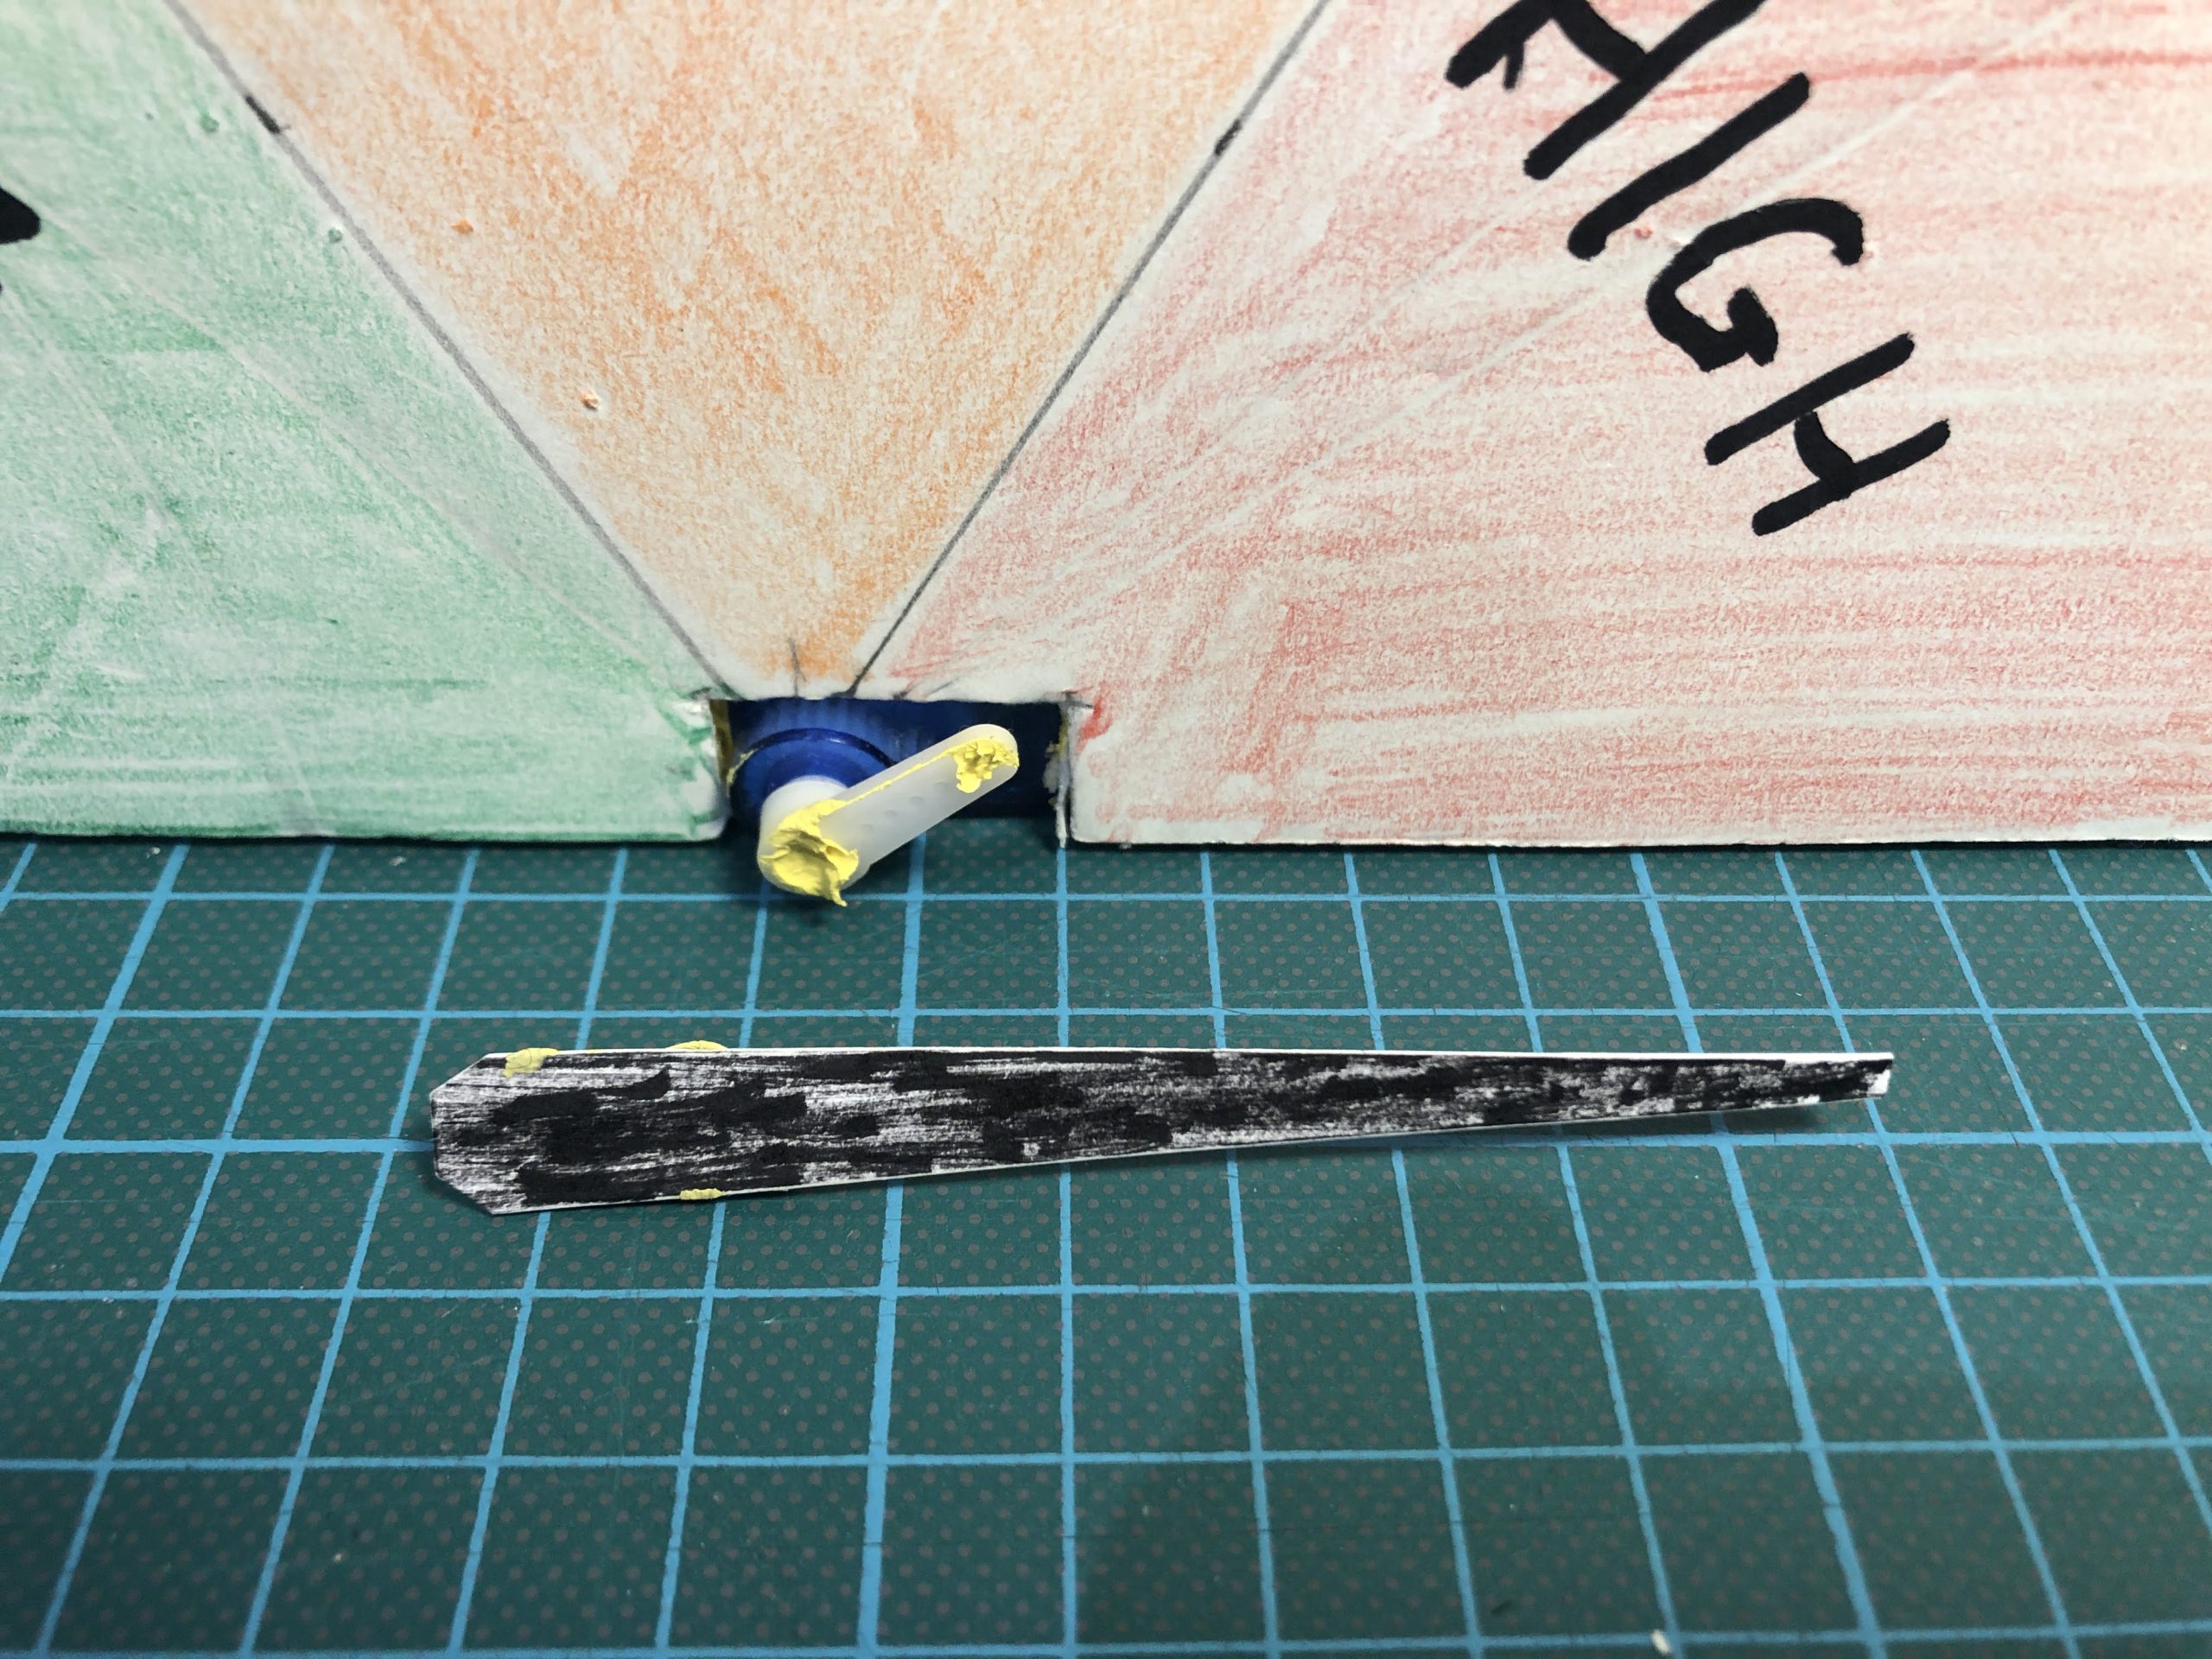
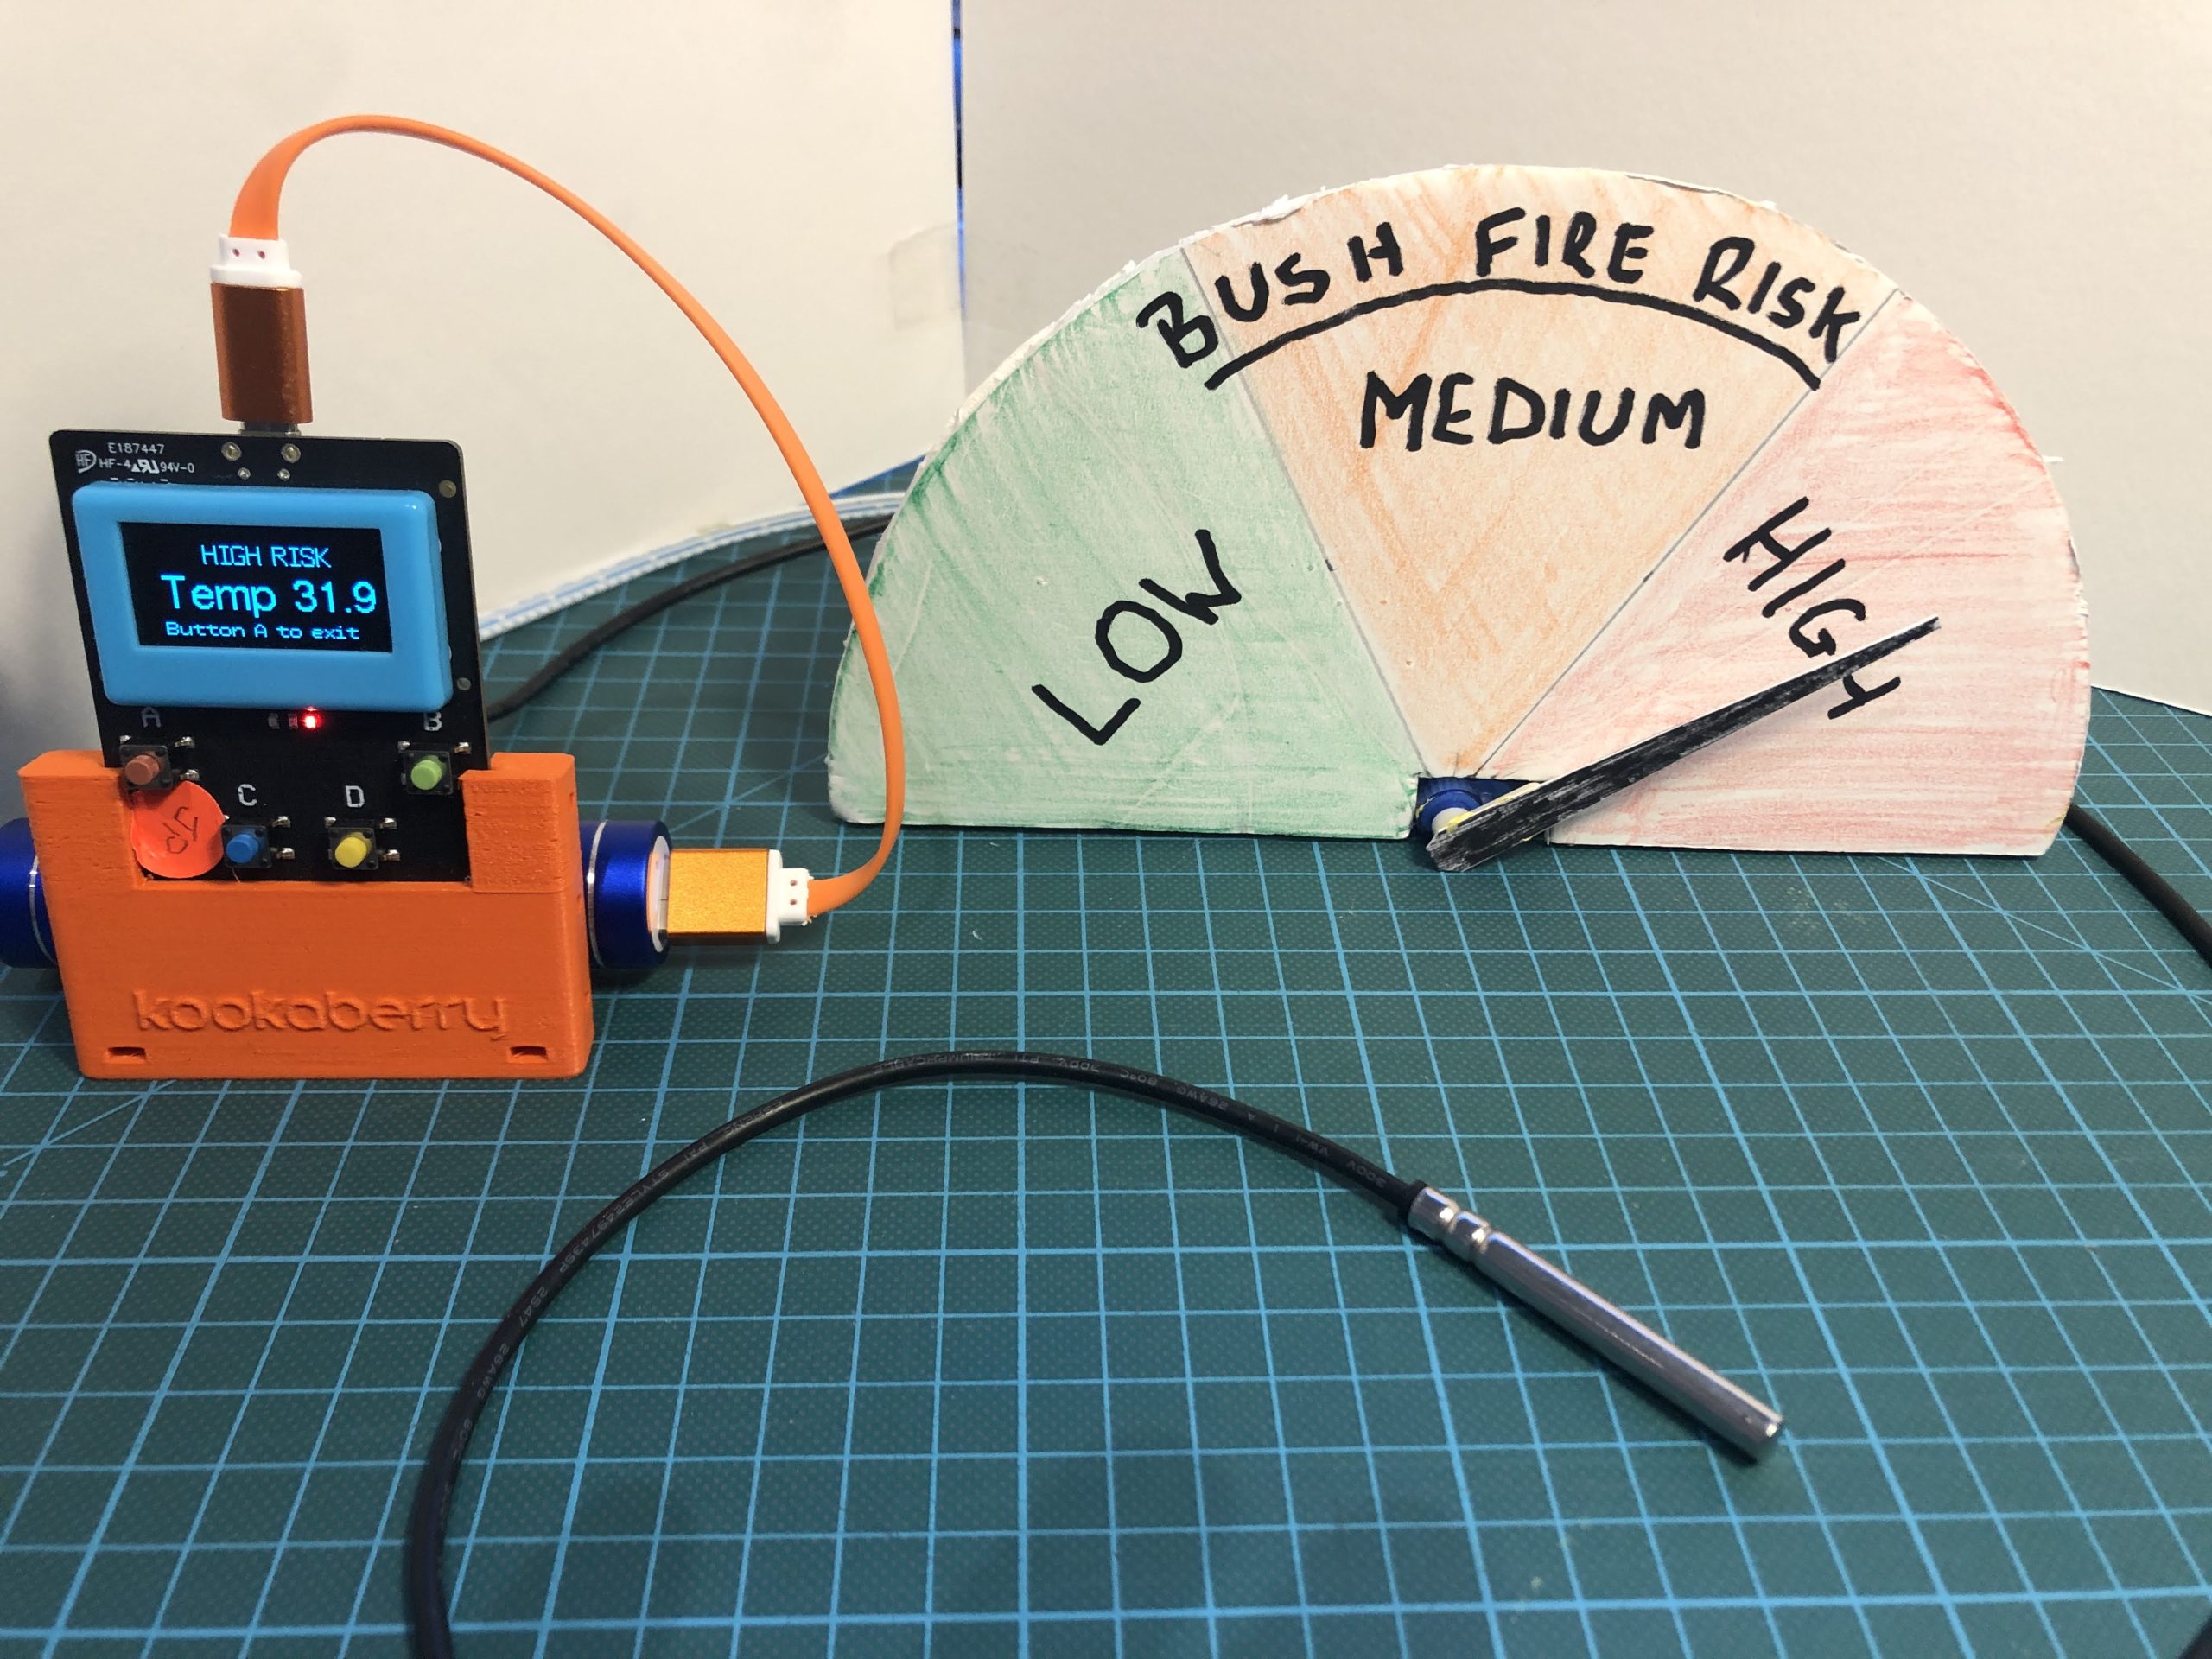
Divide the semicircle into three equal 60 degree parts using a protractor, and colour and mark the indictor as shown in the photos below.
Cut out pointer from the 600gsm card and secure the micro server in place with BluTack. Stick the pointer to the single plastic servo arm and push it onto the servo. This is a temporary position. It will be adjusted later.
Templates can be downloaded from the sidebar to the right.
Connecting up
Connect the Kookaberry to a PC or Mac running KookaBlockly and the micro server to P1. Run KookaBlockly and ensure that you have a blank canvas by pressing the “New: button at top left of the window.
Onscreen Instructions
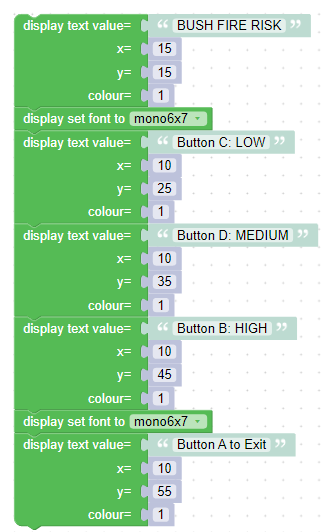
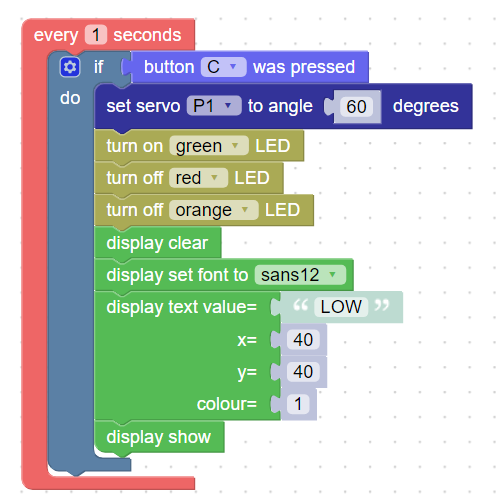
First you will create a programme to show instructions onscreen as shown below. Run the programme to check size and placement of text on screen. Use the blocks from the Display menu.
Setting servo angle
Now create the programme for placing the needle on the correct part of the indicator when the correct button is pressed. You will need blocks from the
- Control menu (loop every 1 second)
- If-Else menu (if-do)
- Buttons menu (button was pressed – use dropdown menu to select button)
- Actuators menu (set servo… )
- LEDs menu (turn on and turn off – select LED from dropdown menu)
- Display menu (display blocks to print text warning on screen
Create the code for each warning one at a time [Tip: Right click on the first if-do block and a dropdown menu will appear which will allow you to duplicate the block. You can then change the parameters for buttons and LED.]
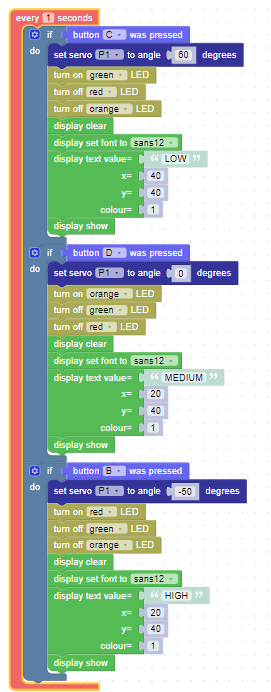
Adjusting the pointer on the indicator
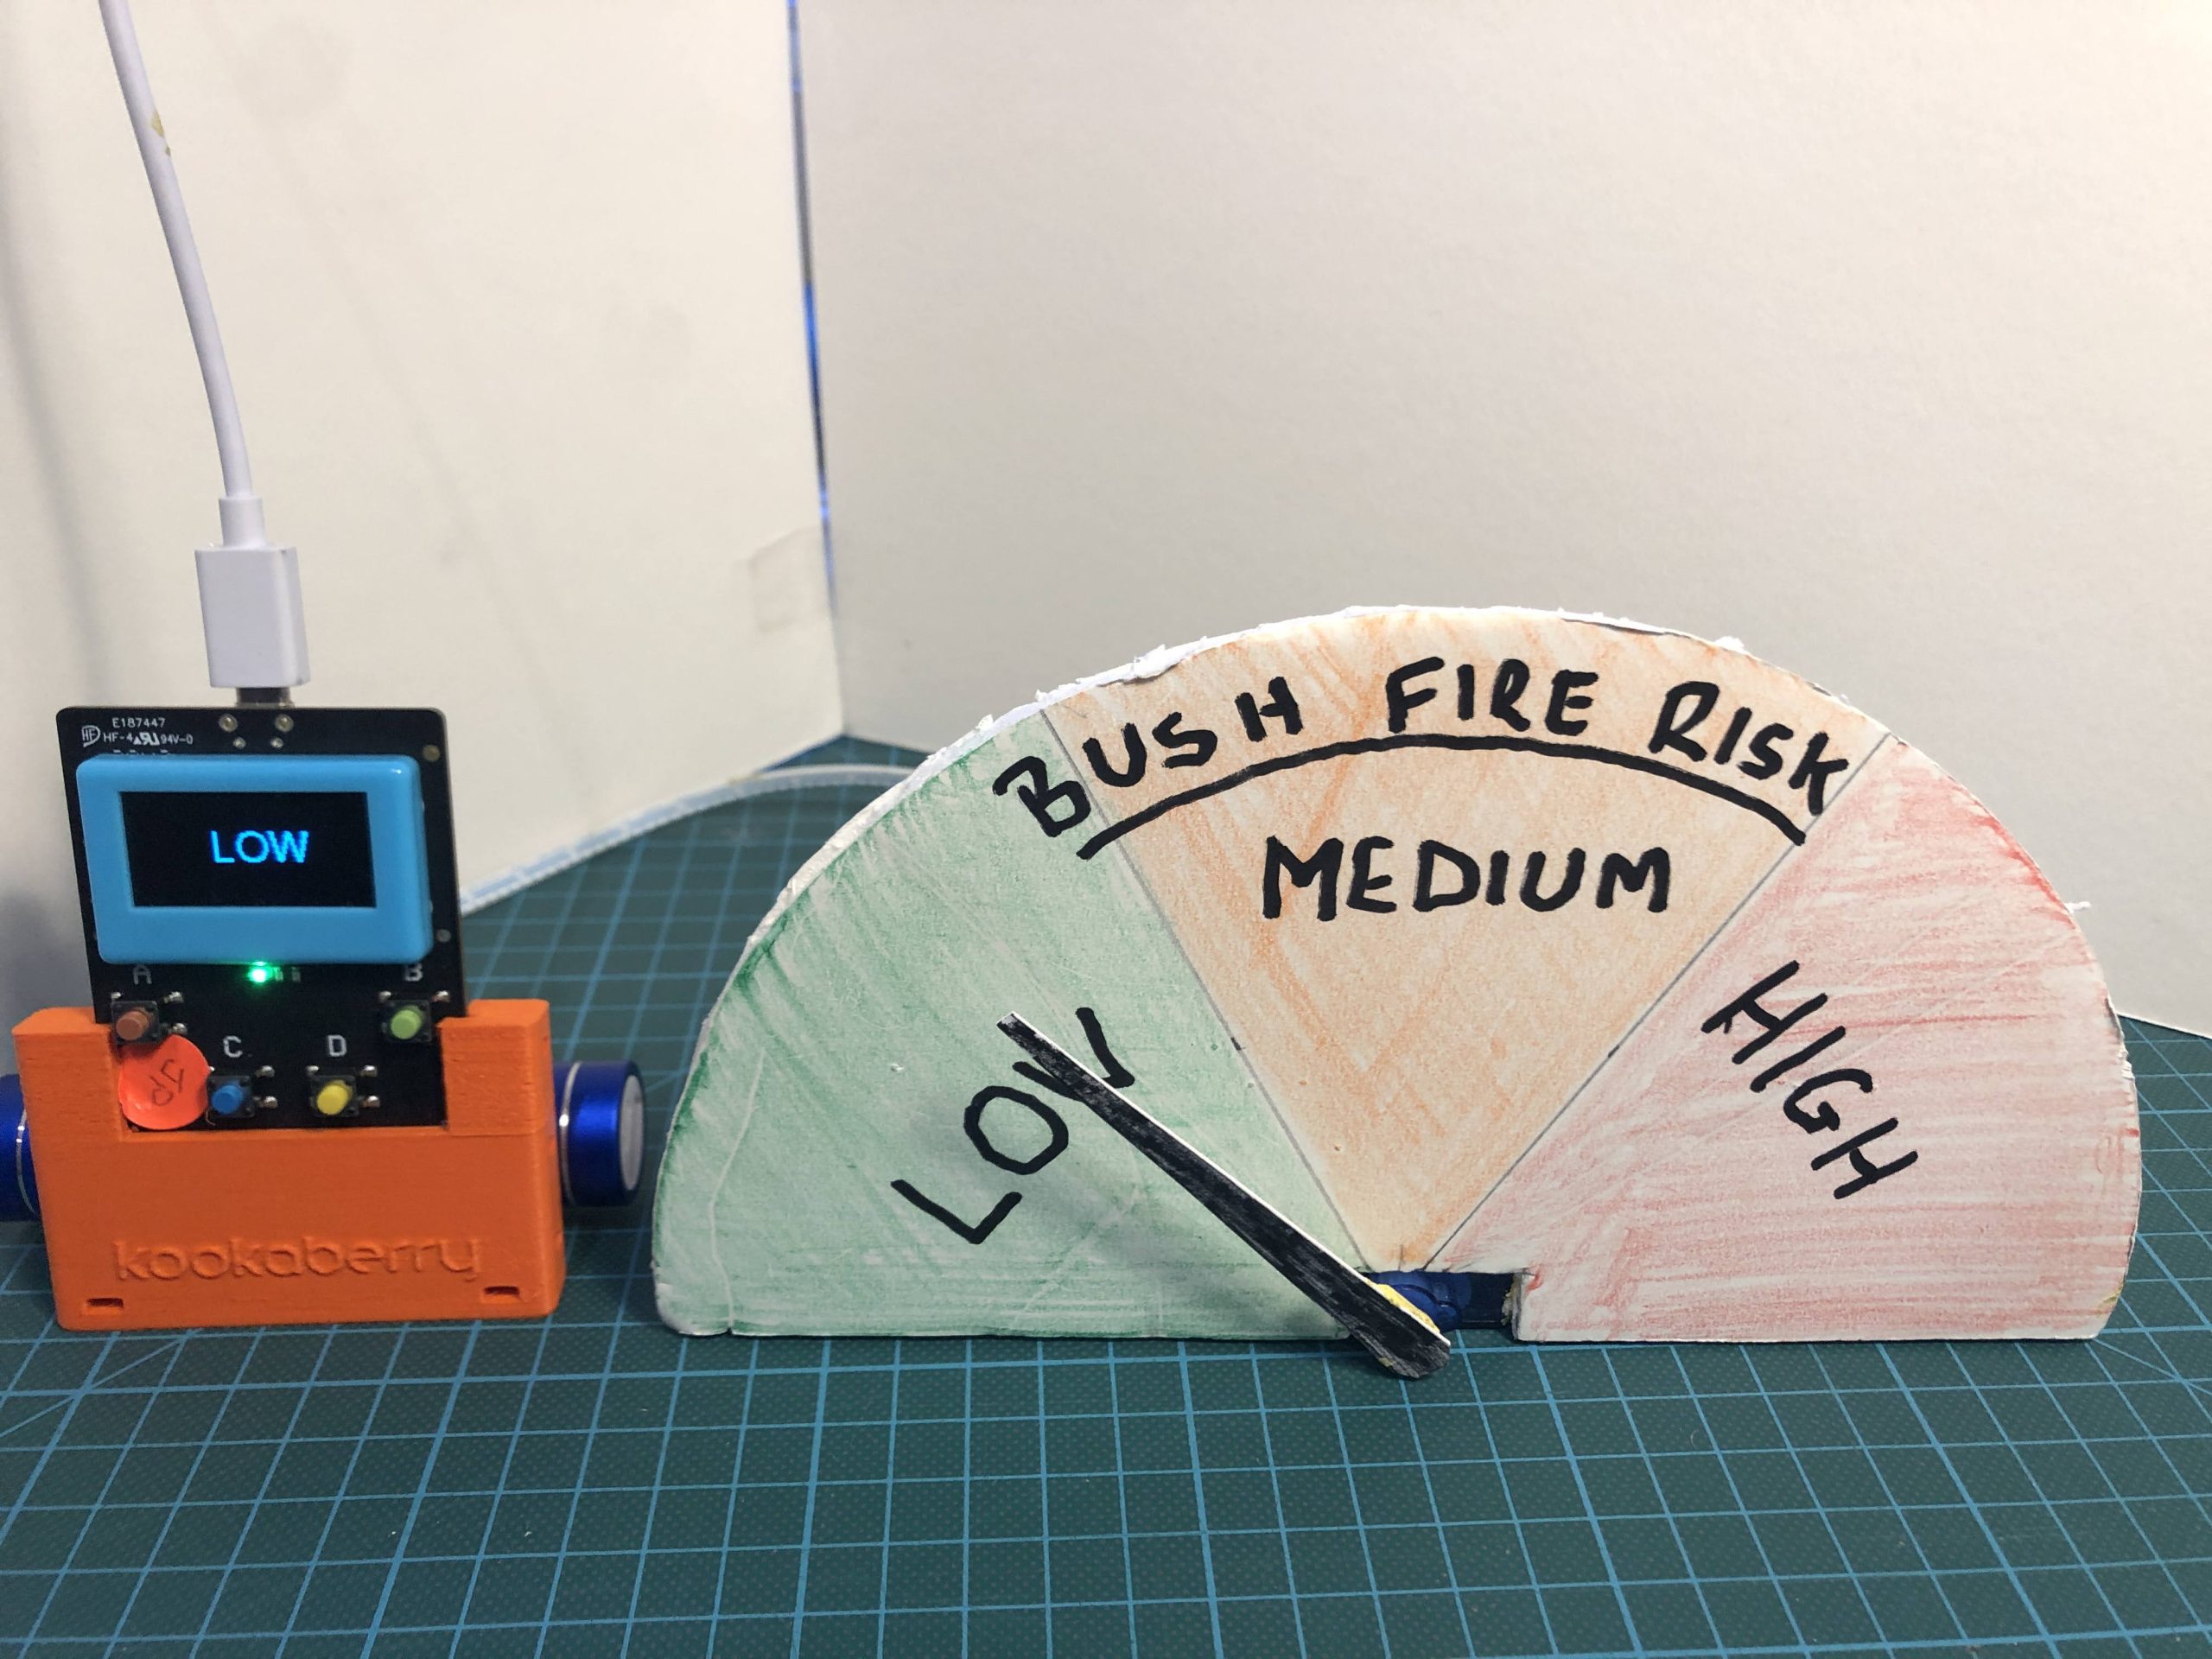
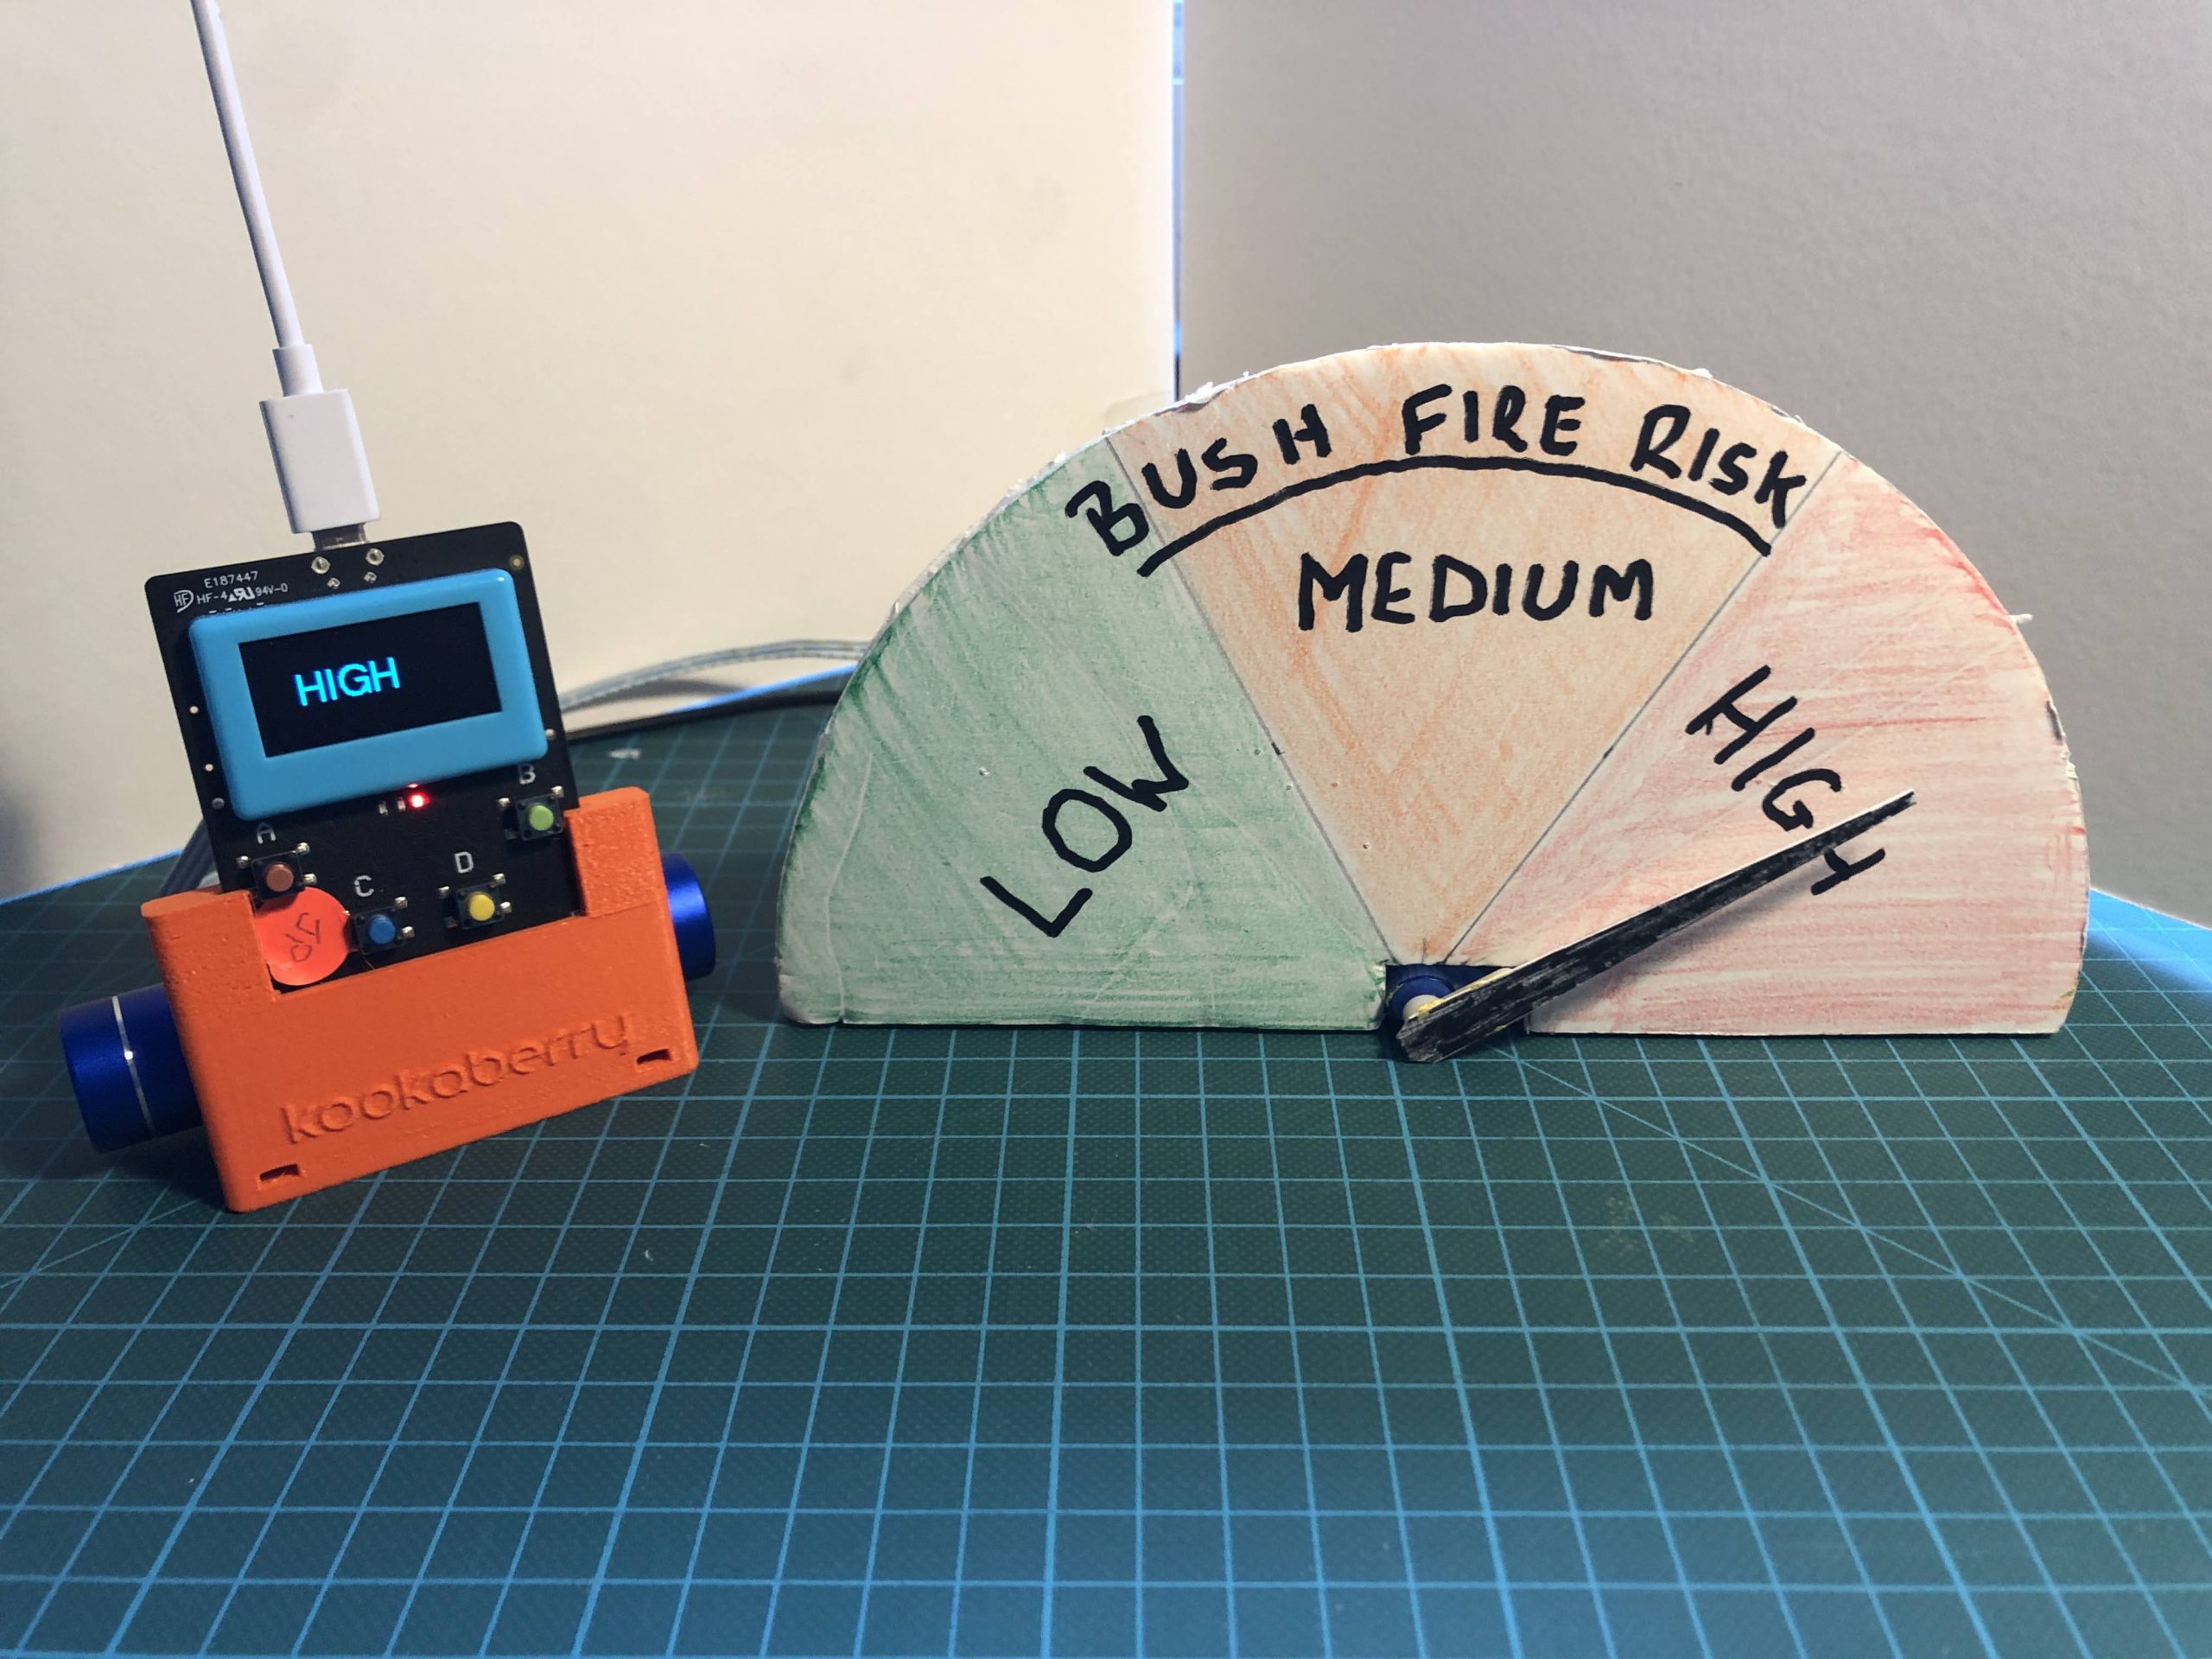
Run the programme and press Button D to indicate Medium Risk. The servo arm will now be at 90 degrees to the table and pointing upward. Adjust the pointer (stuck to the arm with Blue Tack) to also point vertically upwards.
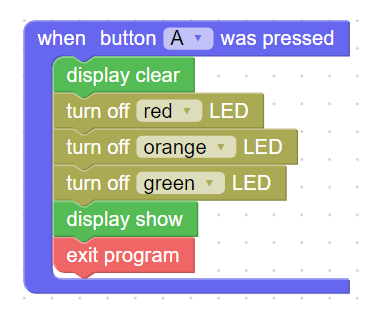
Button A to Exit
As you are going to save your programme to your Kookaberry you will need to add the code for exiting the programme by pressing Button A. You then save it to your programmes folder and to your Kookaberry with an added suffix (.kby) so it can be identified as a KookaBlockly file. You will need blocks from the Buttons, Display, LEDs, and Control menus.

Run the programme
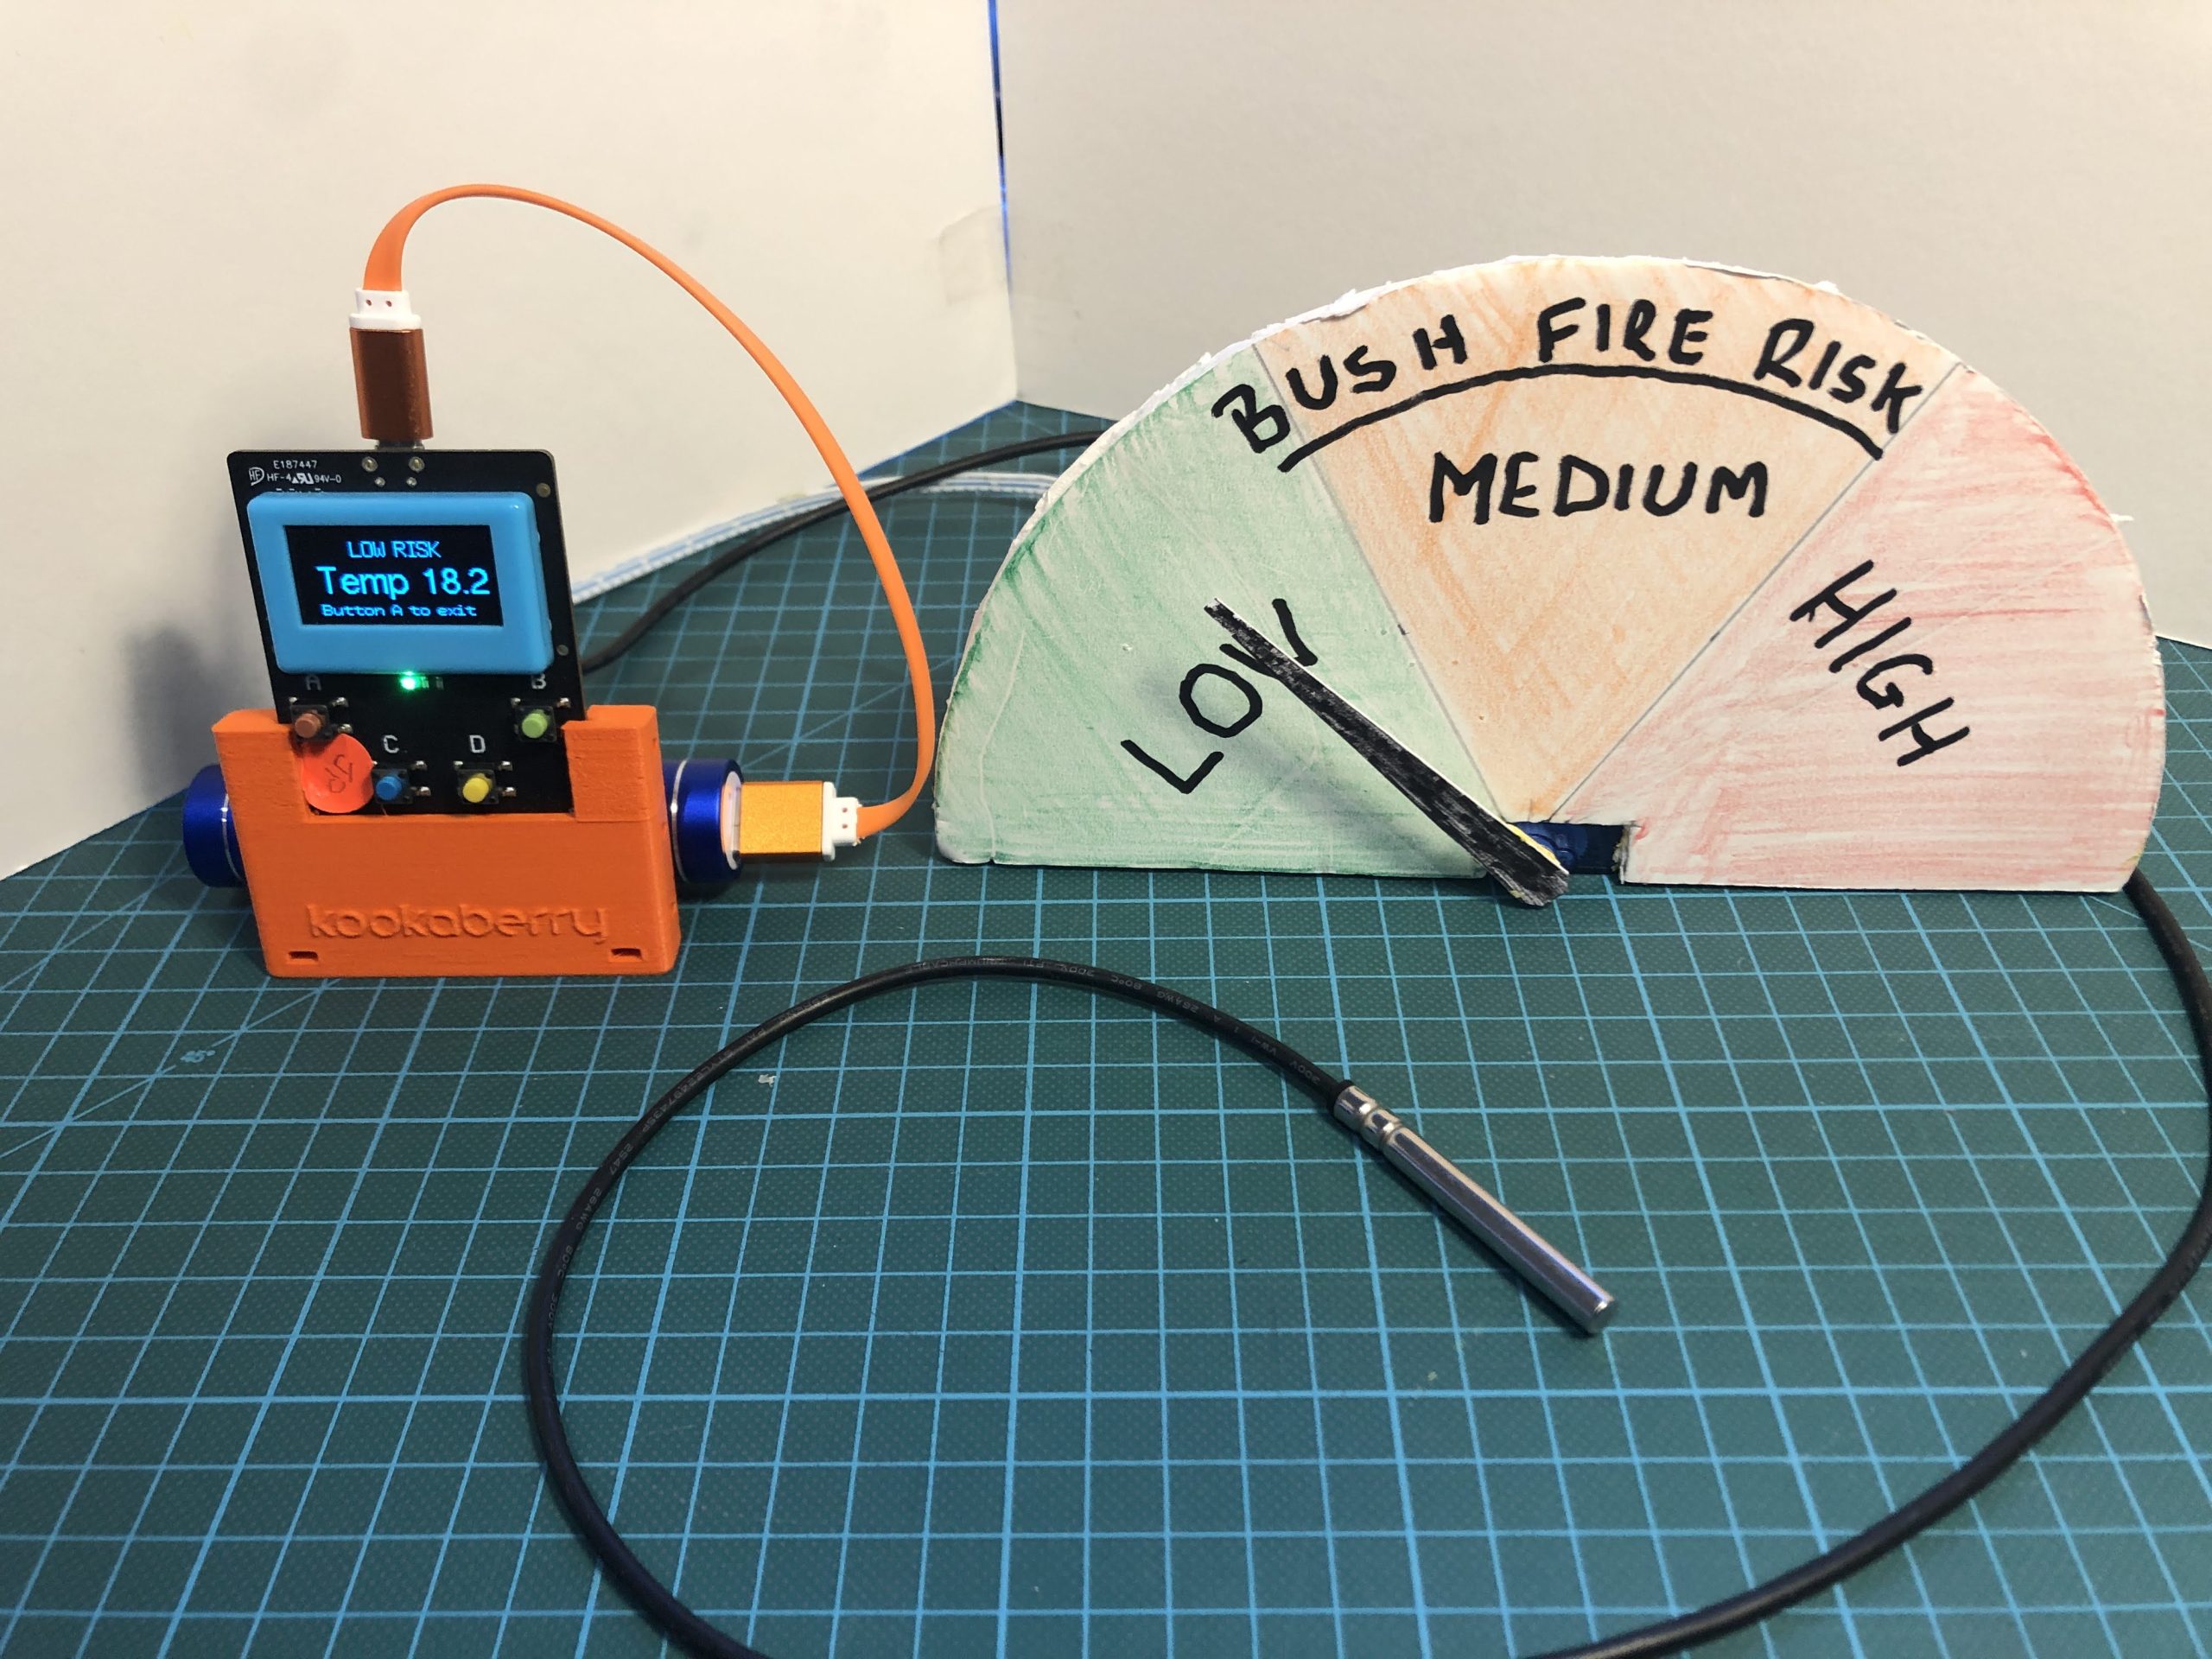
Find the saved programme on the Kookaberry menu and run it using Buttons C, D, and B to move the indicator to the required warning
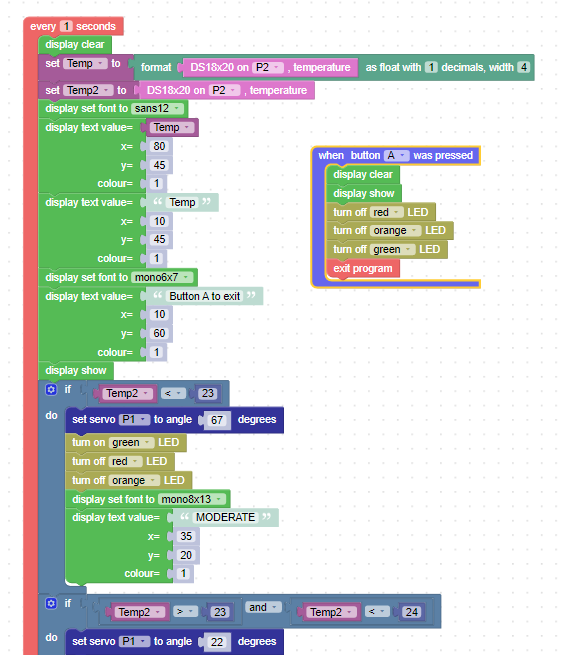
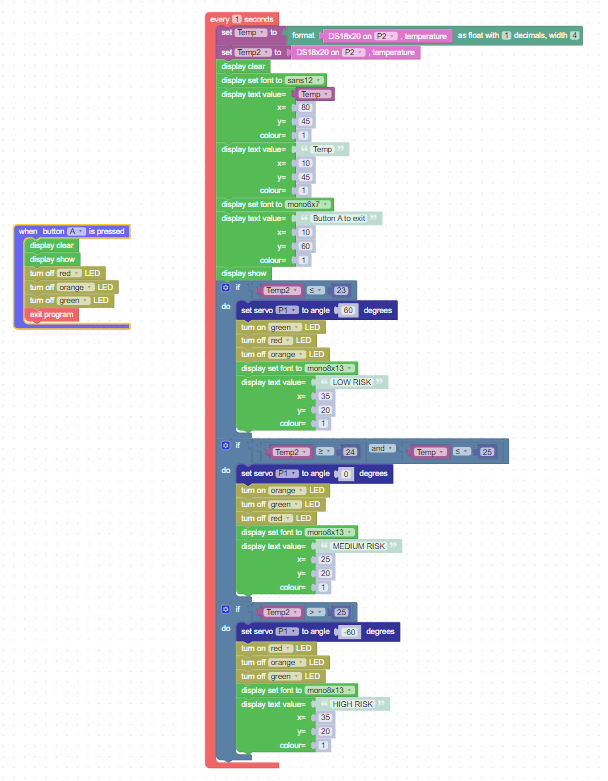
Resource 3: Temperature controlled bush fire risk indicator
In this resource you will add a temperature sensor (DS18B20) which will drive the servo so that the risk warning matches the temperature.
For this example, the temperature ranges are
- LOW RISK: Temp is less than or equal to 23 degrees C
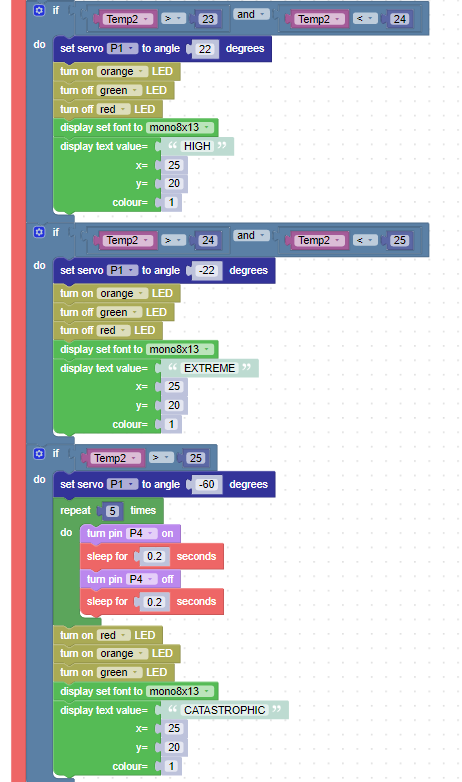
- MEDIUM RISK: Temp is greater than or equal to 24 degrees C, and less than or equal to 25 degrees C
- HIGH RISK: Temp is greater than or equal to 25 degrees C
Connecting up
Connect the Kookaberry to a PC or Mac running KookaBlockly and the Micro Server to P1. Connect the DS18B20 temperature sensor to P2. Run KookaBlockly and ensure that you have a blank canvas by pressing the “New: button at top left of the window.
Adding the code for the DS18B20 sensor
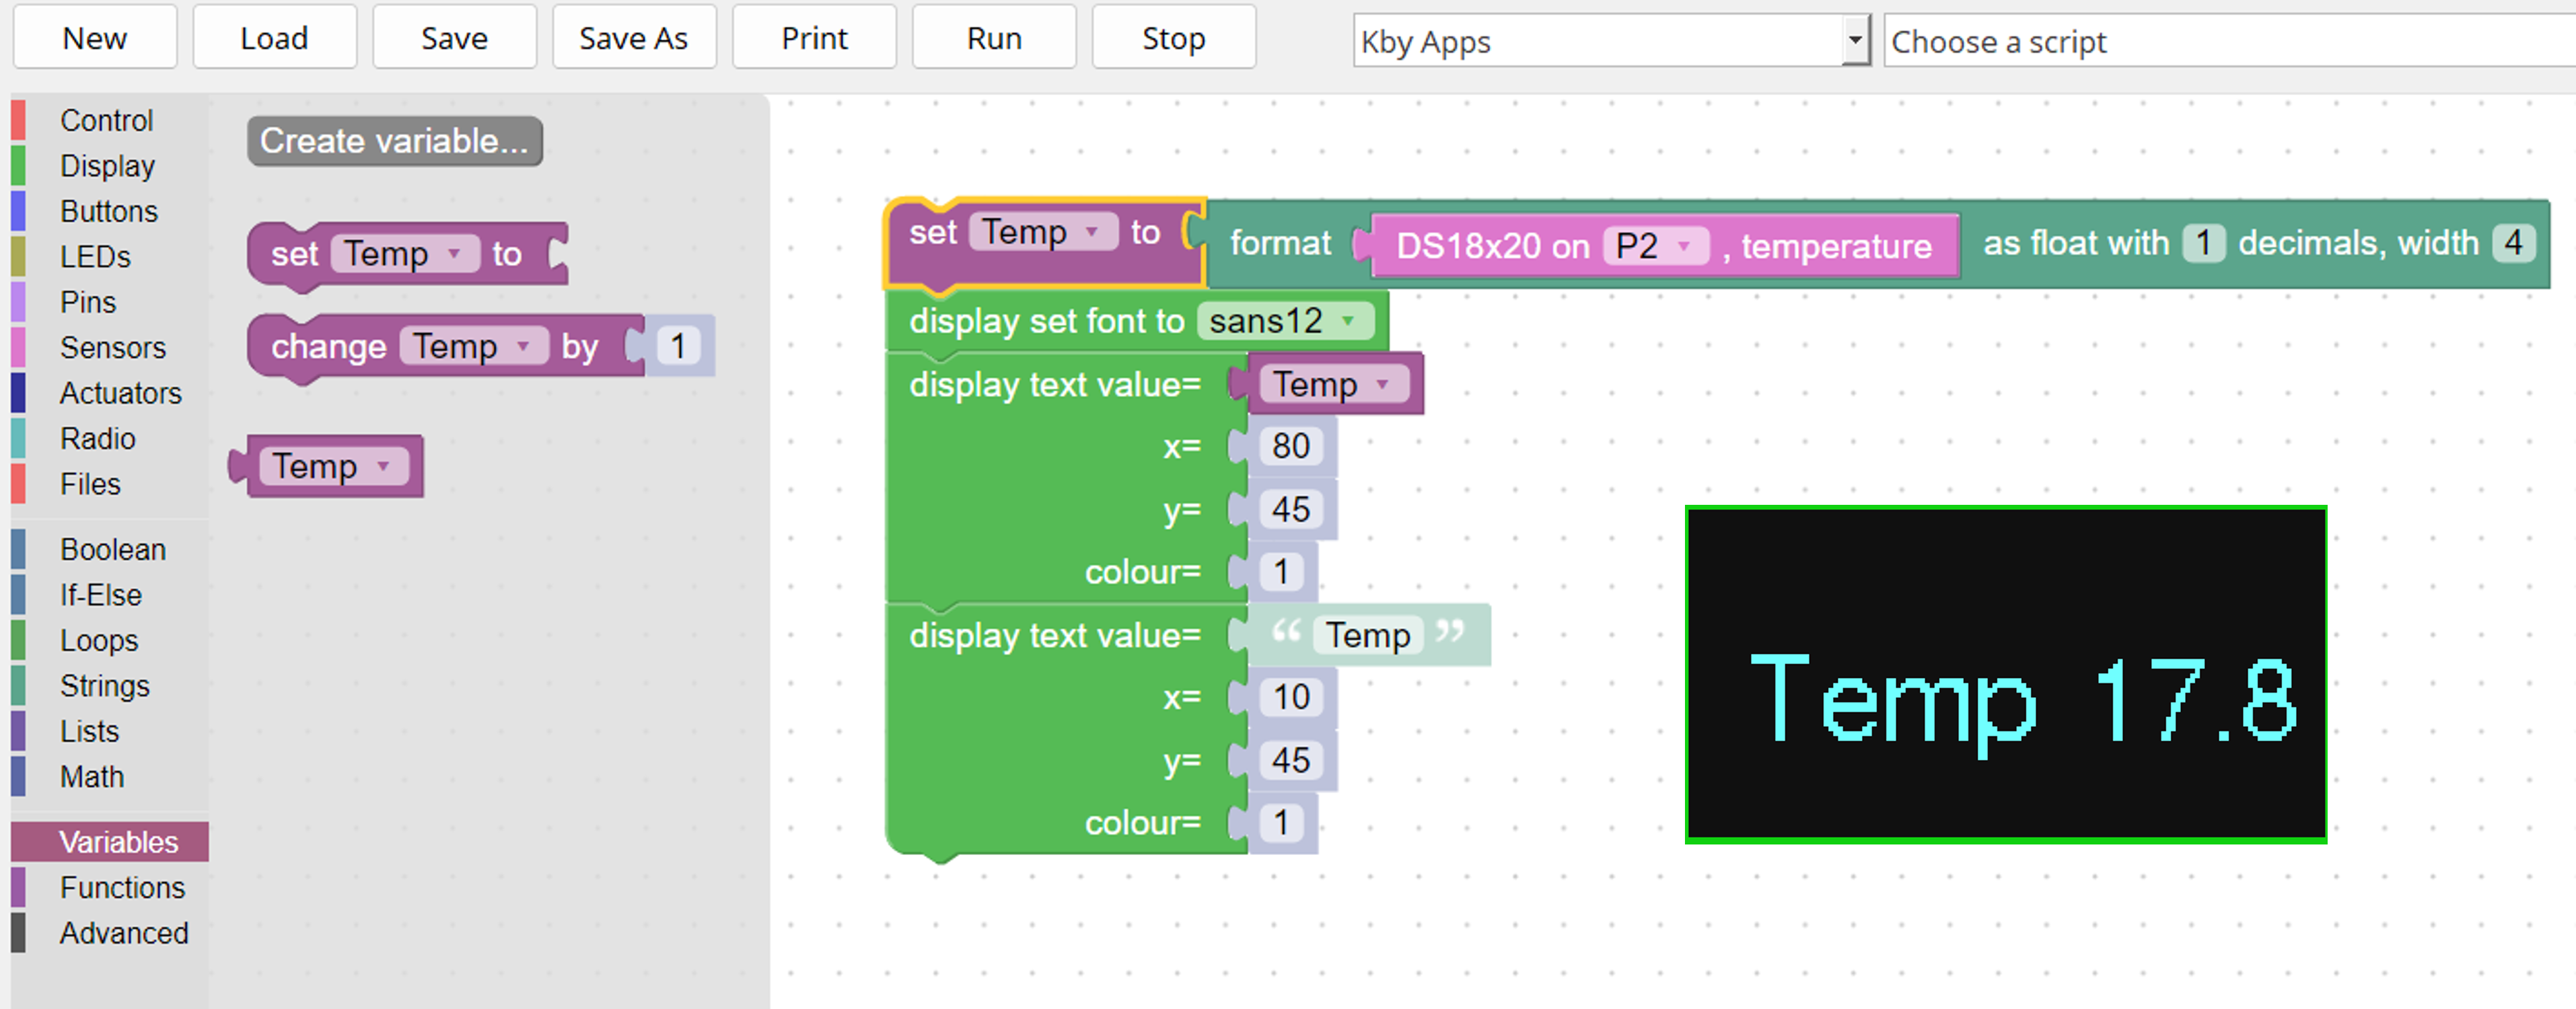
First you have to create a variable called Temp. Temp has to be set to the value being read on P1 from the DS18B20 sensor. This variable will be used to create the temperature displayed on the screen and therefore has to be formatted as a string. Run the code and you will see the current temperature displayed on your Kookaberry.
Adding Temperature range control
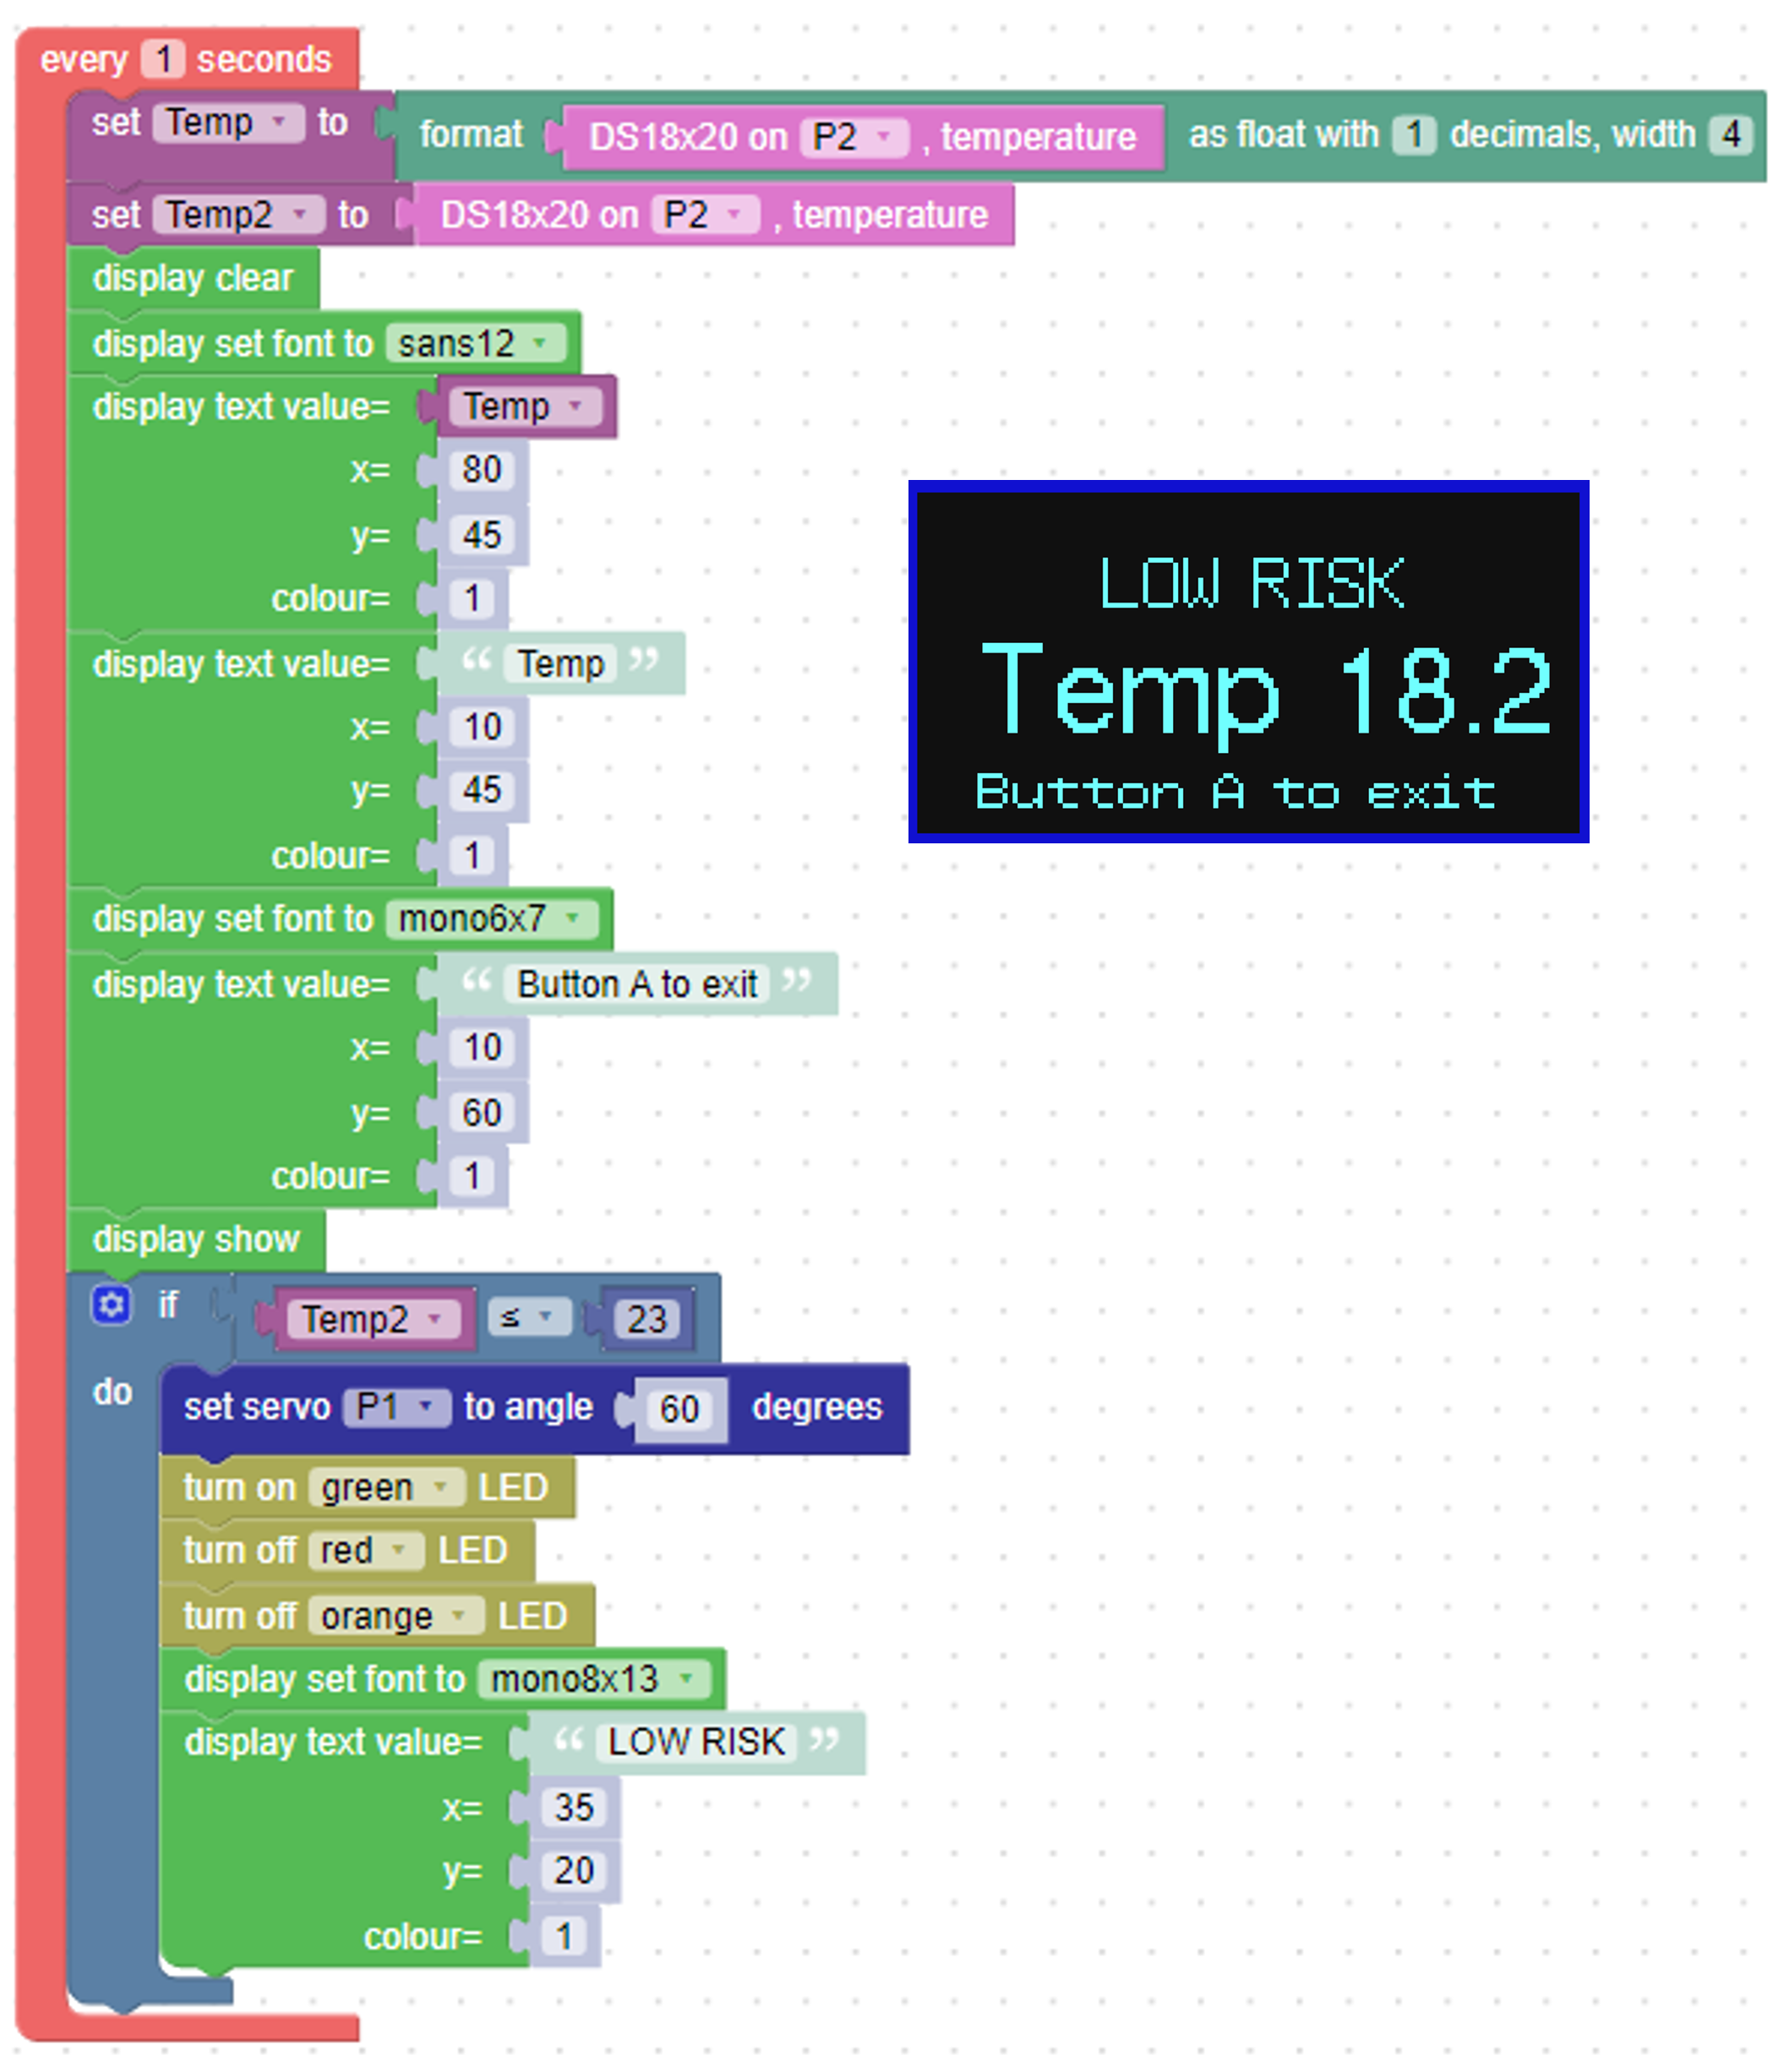
Another temperature variable is needed because the first one (Temp) has already been set as a string. Create a new variable called Temp2 and set it to read the temperature from the DS18B20 sensor on P1.
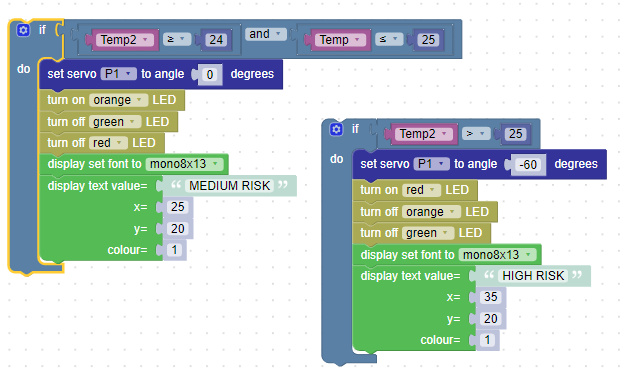
Now use the If-Do statement to create the temperature conditions required to both control the servo and print the warning on the screen. Start with just one (Low Risk) and duplicate to create the other two. Remember to add a control loop.
Also add “Button A to Exit to the screen instructions. Remember to reduce the font size.
Complete programme
Add the code to allow Button A to be used to Exit programme and save your programme – which should look like this.
Run the programme
If the local temperature is below the minimum in your programme (23 degrees in this example) the indicator the needle will show LOW risk. Now hold the sensor in your hand and watch the warnings increase in severity as the temperature rises.
If your local temperature is above 23 degrees, the initial needle indicator will be MEDIUM. In this case, go back to your programme and change the temperature ranges to suit your local environment.
Resource 4: Debugging your KookaBlockly programme in REAL TIME
The ability of KookaBlockly to show the MicroPython script behind the blocks and to access the debugging editor associated with the onboard MicroPython code compiler allows a user to debug a KookaBlockly programme in real time. This is an example…
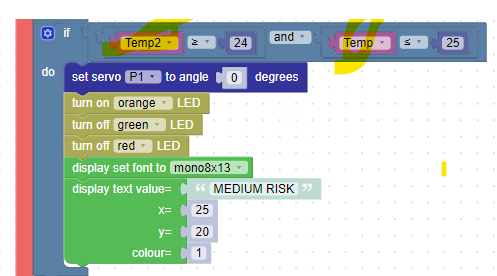
Suppose that you made an error whilst coding the MEDIUM RISK If-Do statement in Resource 3. You are working with two temperature variables – one a string (Temp) and one an object (Temp2) – and you mix them up when defining the temperature range as shown below
Make sure that the Kookaberry is still connected to a PC or Mac running KookaBlockly when you are creating and debugging your programmes.
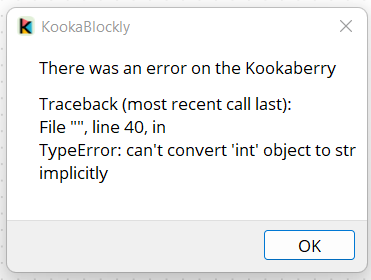
When the temperature of the sensor is raised (use a hair dryer) above 24 degrees, and the MEDIUM RISK conditions are met, the programme stops and the following code error message appears in the KookaBlockly window. It indicates a string/object conversion error on line 40 of the underlying MicroPython code.
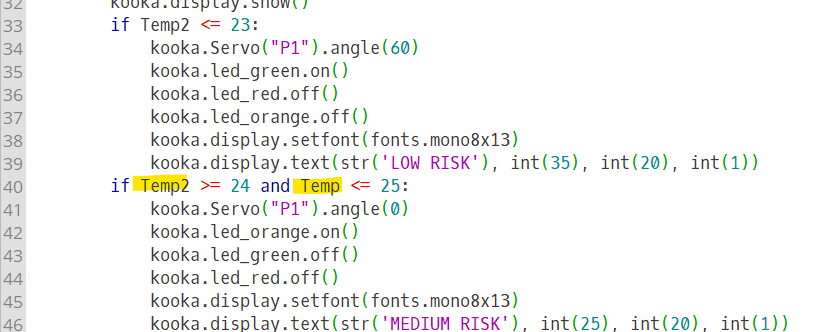
Click in the Show script box at the top right of the screen and expand to full page where you will see that Line 40 contains both the Temp2 and Temp variables It should only contain the one Temp2 variable.
Return to the KookaBlockly window by exiting the script page and correct your programme. You will need to disconnect and reconnect your Kookaberry after you have made the change.
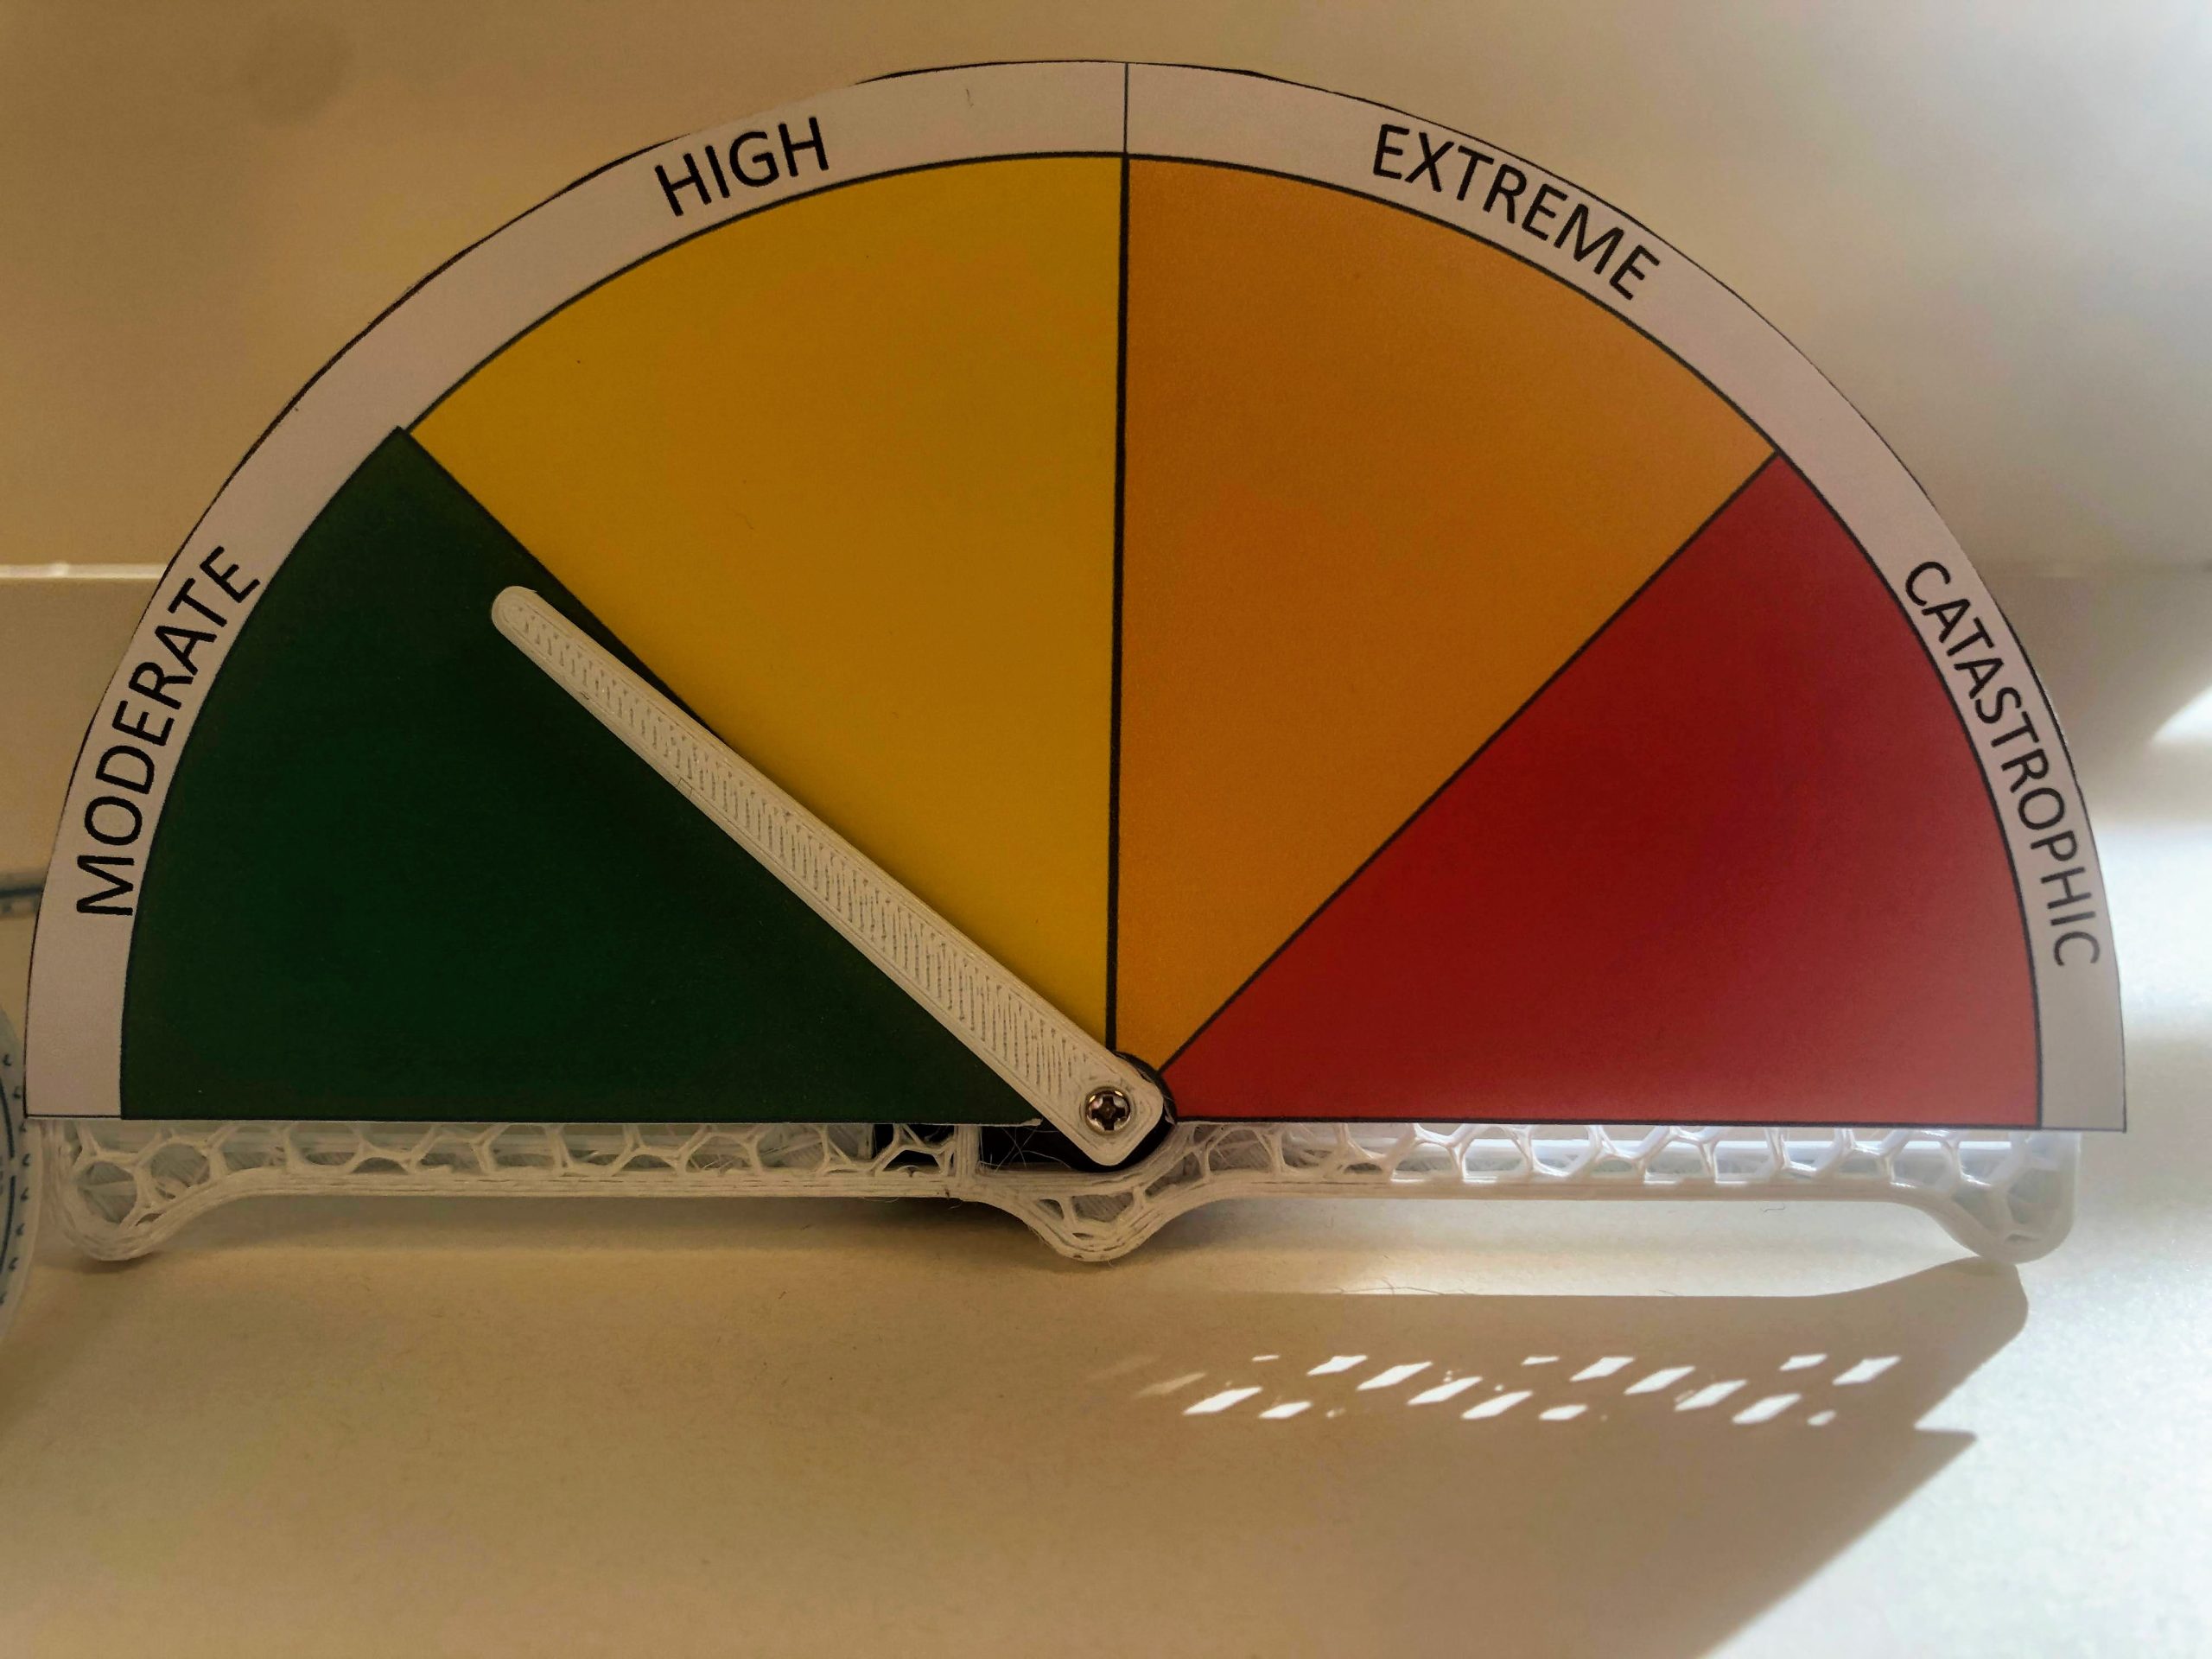
Resource 5: Build and programme an indicator showing the new AFDRS
Overview
On the 1st September 2022 a new 4-stage Fire Danger Rating System (AFRDS) was introduced which replaced the old 6-stage system. The levels are
- MODERATE: Plan and prepare
- HIGH: Be ready to act
- EXTREME: Take action now to protect life and property
- CATASTROPHIC: For your survival, leave bushfire risk areas.
Read more about this change, and the reasons for it at these links
Additional resources
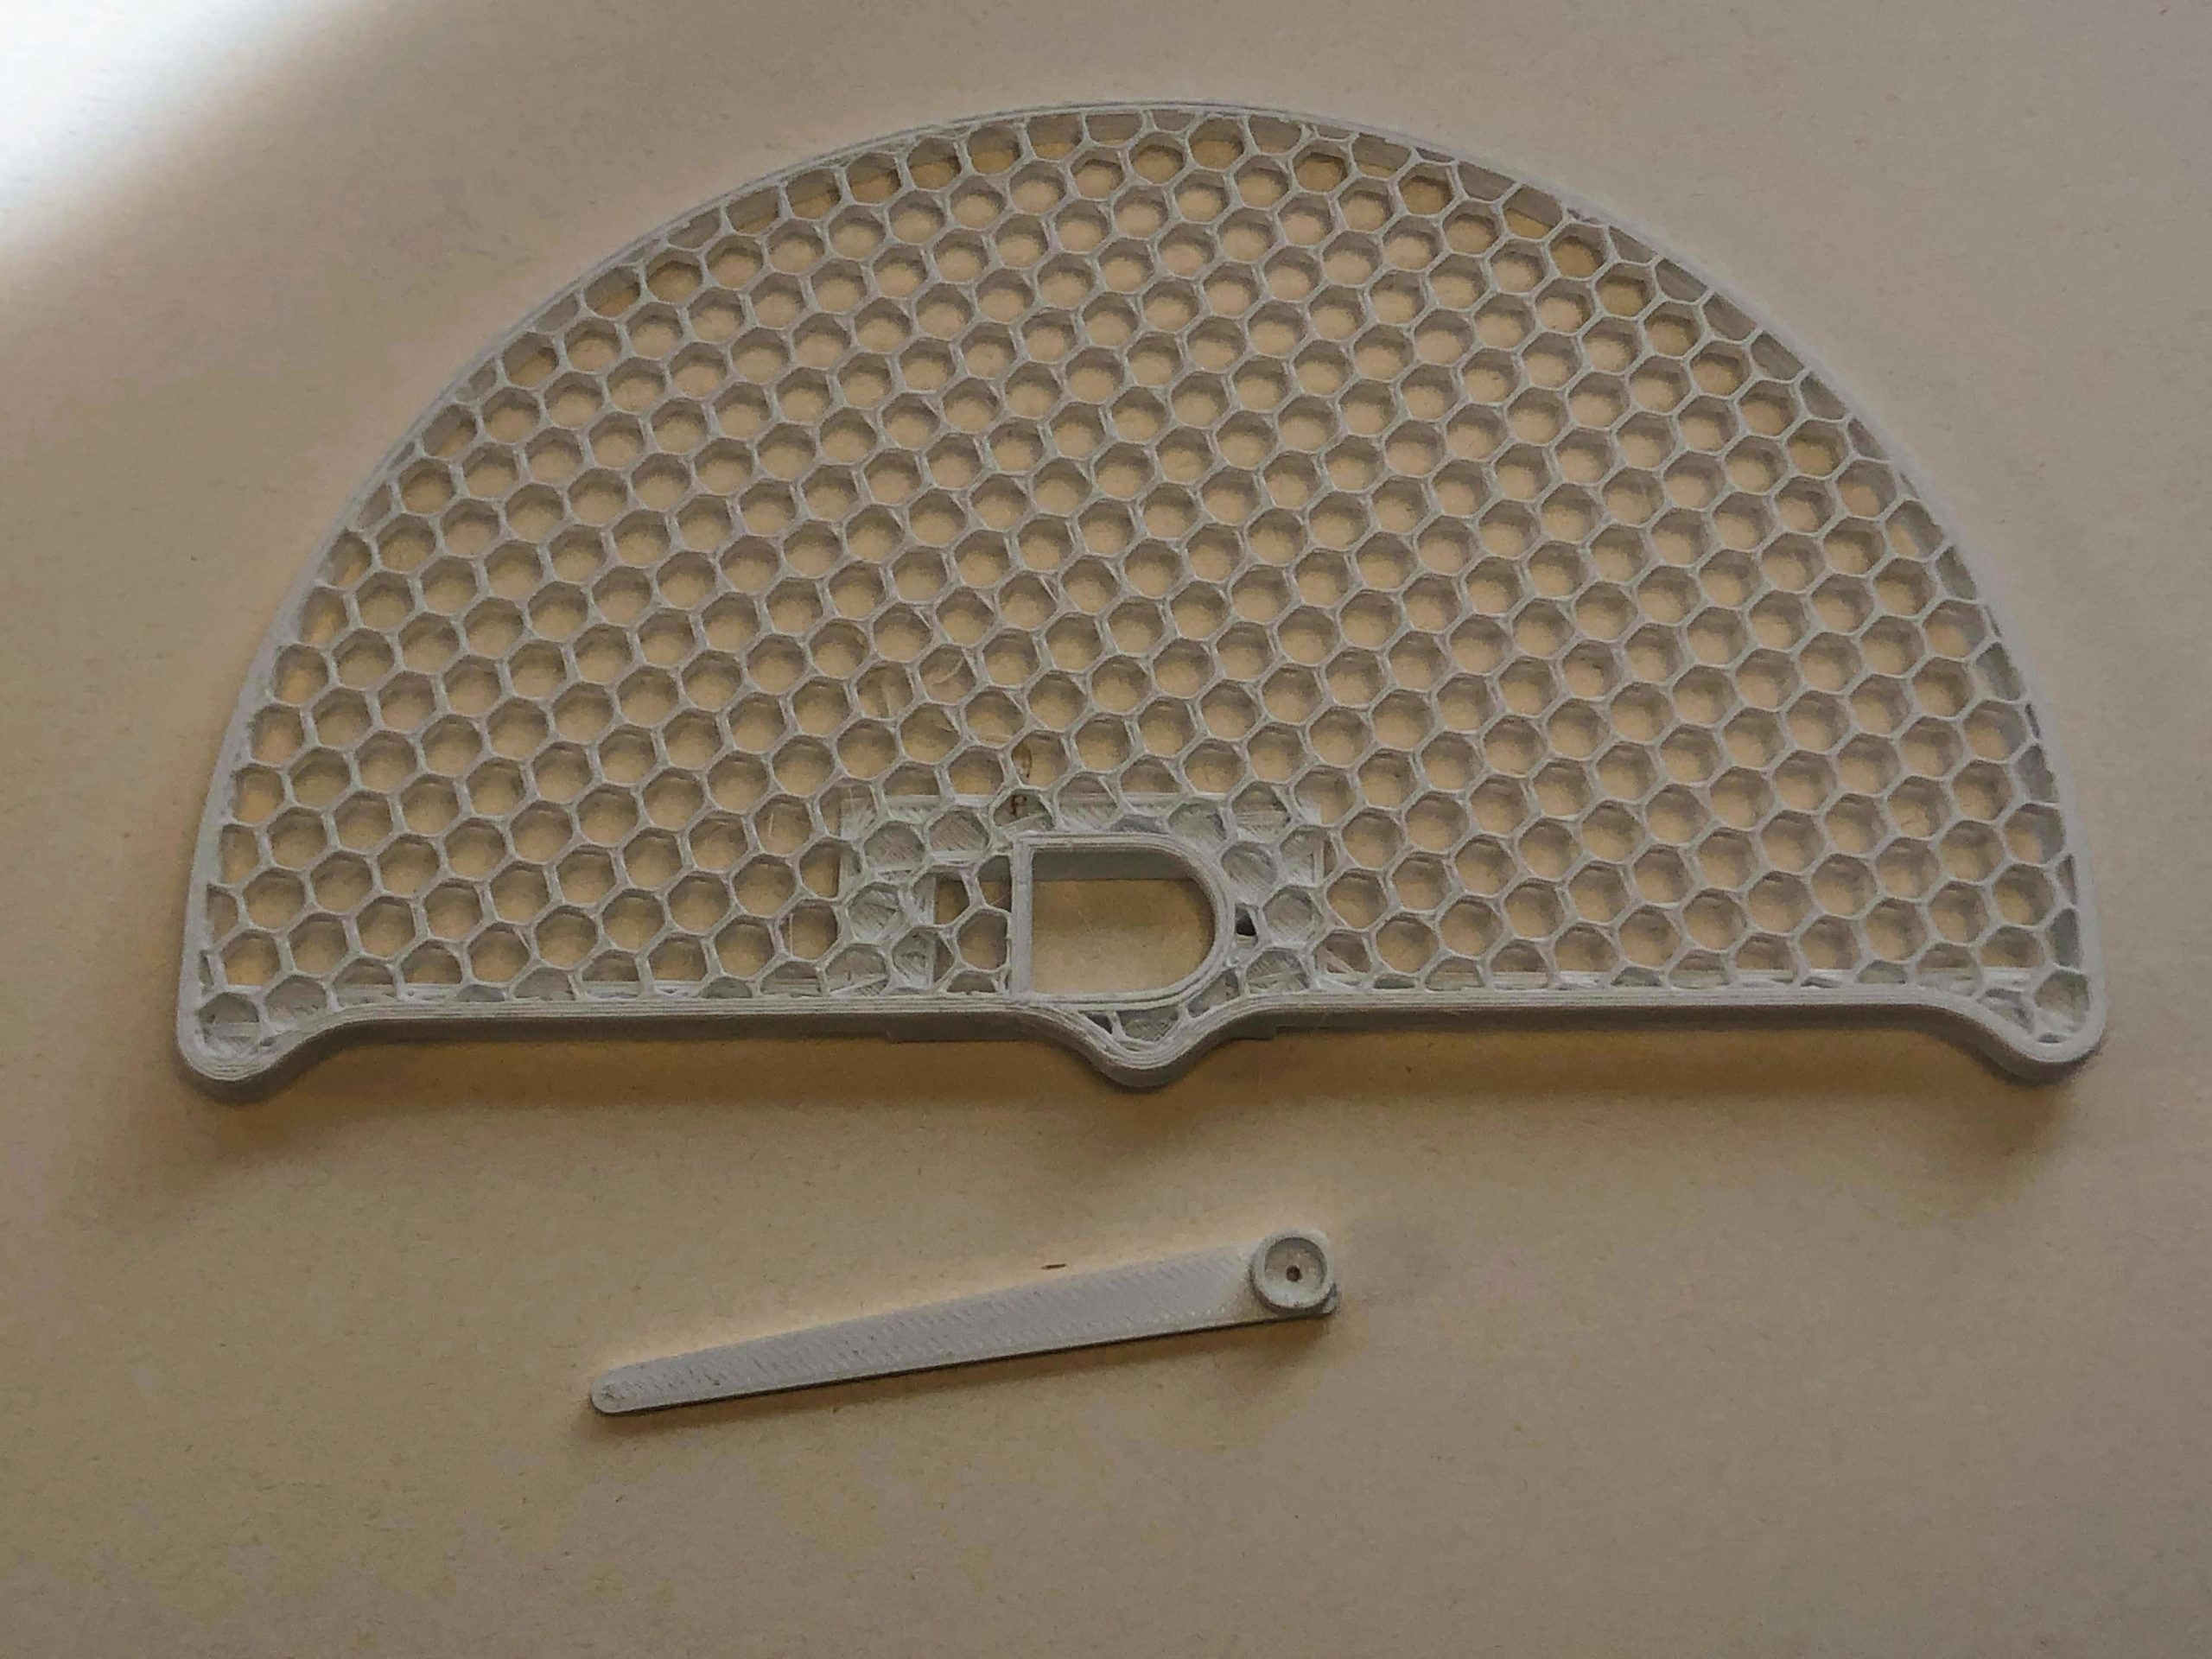
For this Resource 5 you will need to add a buzzer module at Pin 4 to add emphasis to the CATASTROPHIC risk indication and to make up an indicator out of either card and coloured shading like the indicator in Resource 2, or using 3D printed artefacts created from the .STL files and the pdf template which can be downloaded from the sidebar to the right.
[Tip: Print the risk indicator template onto an A4 label and then stick the label to light cardboard and cut it out. Use bits of Blu Tack to stick it onto the backing frame]
Programme code
The programme code used in Resource 3 is used as the basis for the enhanced code required for this programme. An additional “If Do” statement is added; the temperature ranges and descriptors changed, and a repeat “x” times loop added to sound an audible warning for the CATASTROPHIC stage alarm. The code can be downloaded from within the zip file in the sidebar. The file name is FireRiskTV2.kby
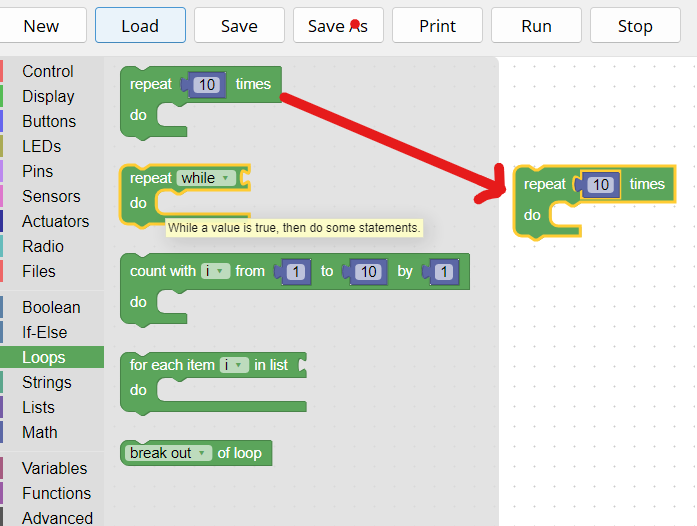
Repeat Loop
Drag the repeat 10 times loop from the Loops menu and change the repeat times to a smaller number
Complete programme
The programme is shown in two images to allow greater detail….