Table of Contents
Overview
If you are familiar with Scratch or any other visual programming environment, this tutorial should provide just enough guidance to allow you to program your Kookaberry in real-time using KookaBlockly. You can download a pdf from the sidebar to the right.
KookaBlockly
Most visual programming editors are based in the cloud and require internet access. KookaBlockly, as well as its text-based counterpart, KookaIDE, need to be installed on your computer. These two editors, along with a Teacher’s Window which mirrors the Kookaberry screen on your computer or Smartboard, comprise AustSTEM’s KookaSuite.
Step 1: Installing KookaSuite
Instructions for installing KookaSuite on your Windows PC or Mac from either the flash drive included in your Kit or from this website can be found in the following tutorials
Step 2: Writing a program
Once you have installed all the KookaSuite and KookaberryScripts files on your computer, open KookaBlockly by clicking on its shortcut. Expand the window to full screen.
![]()
Click on the Scripts menu box and select My Programs. This is the folder to which you will save your own programs. Now click on the Choose a script menu box and select the only program (MyName.kb.py). Click on it to open the program to the canvas (the big blank space…..).
If you cannot see the blocks on the canvas, center the blocks by clicking on the top icon at the bottom right of the canvas.


This simple little program pulls the “display print” and “display text value” blocks from the Display menu and invites you to write your name after the text “My name is…” Just click in the text block and type it in. The x and y coordinates in the display text value box position the start of the text string. In this case it is 30 pixels down the left hand side of the screen. The screen is 128 pixels wide and 64 pixels deep and the first line of text always starts at the top left hand corner of the screen.

Step 3: Connecting your Kookaberry and running the program
IMPORTANT: The work that this little microprocessor is doing in sending instructions to and from your computer is quite complex as it has a very small memory. In some cases it can sometimes get confused and the Kookaberry’s screen will get stuck on its last operation. Don’t worry, just close KookaBlockly,; remove the Kookaberry; reconnect: and start again.
With KookaBlockly still running, connect your Kookaberry to your computer using the flat USB/USB lead. The Kookaberry should automatically connect and show its connection port (COM5 in the screenshot below) in the Serial menu box at the top of the window.
Now click on Run and the text that you programmed will appear on the connected Kookaberry. Click on Show display at the top right of the window and the display on the Kookaberry will appear.
You can drag the display around and change its size to get it out of the way of the blocks. The display uses its own window so that it can be displayed in stand-alone mode on your computer or a Smartboard. If you don’t see it again after performing other actions on the screen, it will still be there – it is just hiding behind the KookaBlockly shortcut. Just click on it to restore…..

You can also show the text based equivalent of the Blockly code in a separate window by clicking on the “Show script” at the top right of the window. Again, the box can be resized and moved around the canvas.

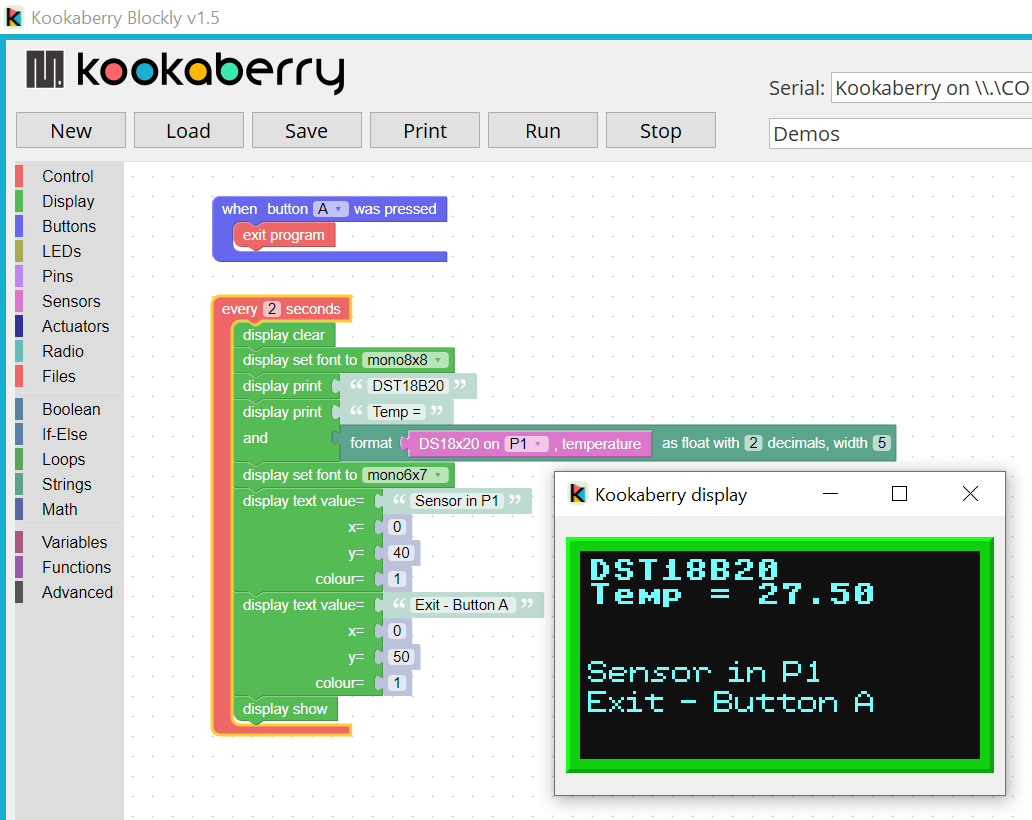
The screen will not be cleared from KookaBlockly unless it is specifically instructed to do so by a “display clear” block within a suitable command. This how you do it by pressing Button A, Try it out…..
![]()
Step 5: Loading a new program
Now try and do the same “Exit from Button A” for the KookaBlockly program in Demos called DS18B20.kby.py. This is a program written in KookaBlockly that does exactly the same (without some of the presentation and datalogging) of the preloaded App SenseDS18.
With a Kookaberry connected to your computer, click on New (to load a new program) and click Yes in the popup menu that appears (you may have to this twice..). Now find Demos in the Scripts menu and select and click on DS18B20.kby.py
Take a DS18B20 probe from the Kit, plug it into P1 and click on Run. The program will show correctly on the screen, but pressing Button A will not clear the screen. Work out what needs to be changed to allow Exit when Button A was pressed……

Step 4: Saving your programs
Go back to the My Name program in your My Programs folder and change it to include your name

Now click Save and save in your My Programs folder under the same file name. This replaces the one that was there in the first KookaberryScripts installation. The following screenshots show the procedure for a Windows PC


Naming KookaBlockly Programs
Programs developed in KookaBlockly should all be saved with the suffix .kby between the name of the program and last suffix .py (eg, my name.kby.py). This will allow them to added to the Kookaberry ‘s USB memory to be activated when not connected to a PC. They will appear as Name.kby in the Menu.
IMPORTANT: KookaBlockly programs can be transformed into MicroPython/Python programs but MicroPython/Python programs cannot be transformed into KookaBlockly programs
Drawing images on the screen
A single 8×8 pixel image
You can draw images on the screen by filling in the pixel spaces in the 8×8 pixel “display image” block. In the example shown below. the “x” is exactly centred on the screen. Midway on the x axis is 64 pixels. Less 4 pixels for the start of the block is therefore the location (60) of the trailing top corner of the pixel box. Location 28 does the same for the y axis.


Larger images
To draw bigger pictures, fill the pixels in multiple “display image” pixel blocks and join them together using maths on the coordinates to make them fit into one blended image. Use the Duplicate function to speed things up. Right click on the block to bring up a menu from which you can select – amongst other things – Duplicate

NOTE: Blocks can be
- made larger by simply using the scroll wheel on your mouse;
- deleted by clicking on them and tapping Delete on your keyboard
- dragged around in groups by dragging on the topmost block
Big Square


KookaBlocklyWorkshop
If you feel you are getting the hang of it – work through some of the examples in the Tutorial: KookaBlockly Workshop. The programs supporting this workshop are in the Scripts menu in KookaBlockly.